Pre-requisites
Power On Powering-on.
Network Interface Network Interface.
Installation Robot Installation.
Attention
Read this document carefully! In case of doubt, consult specialists, experts, or manufacturers of the assemblies used. The robot must not be operated before all uncertainties are clarified. For further assistance, refer to the guides below or contact a specialist.
Important: Contact information is available in the RMA/ Support Section.
Warning: Do not allow untrained individuals or those unfamiliar with robotics or these instructions to operate the robot. Improper use of robots is dangerous.
This guide will walk you through the process of setting up and configuring the Unitree H1 robot, including network configurations, SSH access, internet setup, software installation and various operational controls. Follow the steps below carefully to ensure proper operation.
Autostart
All ROS2 drivers for the H1 developed by MYBOTSHOP operate with the environment variable ROS_DOMAIN_ID=10. To start the custom Mybotshop ROS2 drivers for the H1, run the following command:
Note
Please ensure that the robot’s arms are straight down when you power on the robot. If the arms are in a different orientation, it may affect the ROS2 control operations.
ros2 launch h1_bringup system.launch.py
This command starts the driver for operating the H1 in high-level mode for the legs and arms.
Important
The arms will initialize and move so that the forearms are facing forward.
The H1 ROS2 driver includes the following components:
Domain Bridge
Joint States
Robot Description
Arm Control
Leg Control (High-level)
Inertial Measurement Unit Publisher
Sensor Fusion
Twist Mux
Logitech F710 Control
D435i Depth Camera Driver
Livox Mid360 LiDAR Driver
2D Scanner
Webserver
Coming Soon
Not Supported
Teleoperation
Command Line Interface
This requires the installation of the ROS2 Modules on H1. If not done please follow installation on H1 ROS2 Modules section. To teleoperate the H1, run the following command in one of the SSH sessions: .. code-block:: bash
ROS_DOMAIN_ID=10 ros2 run teleop_twist_keyboard teleop_twist_keyboard –ros-args –remap cmd_vel:=/h1_unit_238/cmd_vel
Command Line Interface
To teleoperate the H1, run the following command in one of the SSH sessions:
ROS_DOMAIN_ID=10 ros2 run teleop_twist_keyboard teleop_twist_keyboard
Steamdeck Integration
Important
The Lidar data and camera stream are dependent on the DDS configuration and the WiFi dongle being used.
Setup Instructions:
Before launching the H1 bringup, run the following command on the H1:
ros2_wifiLaunch the system:
ros2 launch h1_bringup system.launch.pyClick on the joystick controller icon on the Steamdeck to access controls.
Controls:
Leg Control:
Slow Movement: L1 + Left Joystick
Right Movement: R1 + Left Joystick
Arm Control:
To be announced (TBA). This can be modified using the h1_steamdeck libjoy.
Visualization
RViz2
You can view the H1’s current state by entering the following command in one of the SSH sessions:
ros2 launch h1_viz view_robot.launch.py
H1 Robot Visualization in RViz
RViz2
You can view the H1’s current state by entering the following command in one of the SSH sessions:
ros2 launch h1_viz view_robot.launch.py
H1 Robot Visualization in RViz
Rigs
Not Supported
Not Supported
Manipulation
H1 Robot Control
Modes Selection
Important
Most functionalities are disable for Unitree H1. Startup requires remote.
Posture & State Commands
Command |
Description |
|---|---|
|
Set all motors to damping mode. |
|
Start locomotion control. |
|
Stand up from sitting/squatting. |
|
Disable torque on all motors. |
|
Stop all motion immediately. |
|
Stand at high position. |
|
Stand at low position. |
|
Stand with balance mode active. |
Setter Commands (Change Robot State)
Command |
Parameters |
|---|---|
|
Integer FSM ID to switch to. |
|
Enable (1) or disable (0) balance mode. |
|
Set swing height in meters. |
|
Set stand height in meters. |
|
Set velocity (m/s, m/s, rad/s, [duration in s]). |
|
Command motion without duration. |
|
Set active task ID. |
|
Change locomotion speed mode. |
Getter Commands (Query Current Robot State)
Command |
Returns |
|---|---|
|
Current finite state machine ID. |
|
Current FSM mode. |
|
Current balance mode (0/1). |
|
Current swing foot height. |
|
Current standing height. |
|
Current gait phase vector. |
Toggle Commands
Command |
Parameters |
Description |
|---|---|---|
|
bool |
Enable or disable continuous gait mode. |
|
bool |
Switch between movement mode and standing mode. |
Examples
Damp State:
ROS_DOMAIN_ID=10 ros2 service call /h1_unit_238/hardware_modes h1_interface/srv/H1Modes \
'{"request_data": "damp"}'
Dual Arm Record H1-2
Warning
When launch the arm driver the arm violently snaps to the H1-2 initial position. Ensure the arms are near to the start position to prevent damage to the robot and keep surrounding area clear.
ros2 launch h1_platform h1_2_arm_record.launch.py
Configuration
Update to requirements the /opt/mybotshop/src/mybotshop/h1_platform/config/h1_2_dual_arm_controller.yaml file
Start recording
Important
Keep in mind the arms will start moving from this area so try to keep away from the body to avoid scratches. In the end of the recording be sure to bring the arms in a location close to the initial position for the next recording session.
ROS_DOMAIN_ID=10 ros2 service call /h1_unit_238/dual_arm/record std_srvs/srv/SetBool "data: true"
Stop recording and save
ROS_DOMAIN_ID=10 ros2 service call /h1_unit_238/dual_arm/record std_srvs/srv/SetBool "data: false"
Play last recorded trajectory
ROS_DOMAIN_ID=10 ros2 service call /h1_unit_238/dual_arm/playback h1_interface/srv/H1Modes "request_data: ''"
Play specific file
ROS_DOMAIN_ID=10 ros2 service call /h1_unit_238/dual_arm/playback h1_interface/srv/H1Modes "request_data: '/opt/mybotshop/h1_2_trajectories/trajectory_20250925_160052.csv'"
Dual Arm Control H1-2
ros2 launch h1_platform h1_2_arm_server.launch.py
Configuration
Update to requirements the /opt/mybotshop/src/mybotshop/h1_platform/config/h1_2_dual_arm_controller.yaml file
Poses
T pose
ROS_DOMAIN_ID=10 ros2 action send_goal /h1_unit_1789/dual_arm/follow_joint_trajectory \
    control_msgs/action/FollowJointTrajectory \
    "{trajectory:
        {joint_names: [
            left_shoulder_pitch, left_shoulder_roll, left_shoulder_yaw, left_elbow,
            left_wrist_roll, left_wrist_pitch, left_wrist_yaw,
            right_shoulder_pitch, right_shoulder_roll, right_shoulder_yaw, right_elbow,
            right_wrist_roll, right_wrist_pitch, right_wrist_yaw],
        points: [
            {positions: [0.0, 0.3, 0.0, 1.57, 0.0, 0.0, 0.0,   0.0,-0.3, 0.0, 1.57, 0.0, 0.0, 0.0],
            time_from_start: {sec: 2, nanosec: 0}},
            {positions: [0.0, 1.57, 0.0, 1.57, 0.0, 0.0, 0.0,  0.0,-1.57,0.0, 1.57, 0.0, 0.0, 0.0],
            time_from_start: {sec: 5, nanosec: 0}}
        ]}}"
Ready pose
ROS_DOMAIN_ID=10 ros2 action send_goal /h1_unit_1789/dual_arm/follow_joint_trajectory \
control_msgs/action/FollowJointTrajectory \
"{trajectory:
    {joint_names: [
        left_shoulder_pitch, left_shoulder_roll, left_shoulder_yaw, left_elbow,
        left_wrist_roll, left_wrist_pitch, left_wrist_yaw,
        right_shoulder_pitch, right_shoulder_roll, right_shoulder_yaw, right_elbow,
        right_wrist_roll, right_wrist_pitch, right_wrist_yaw],
    points: [
        {positions: [0.0, 0.3, 0.0, 0.7, 0.0, 0.0, 0.0,
                    0.0,-0.3, 0.0, 0.7, 0.0, 0.0, 0.0],
        time_from_start: {sec: 2, nanosec: 0}},
    ]}}"
Leg Control Mode
The following H1 modes are available via ROS2 services:
- damp
- stand_switch
- increase_swing_height
- decrease_swing_height
- enable_ctrl
Note
Pressing the Tab key on the keyboard will autocomplete the service request.
Example of Activating a Mode
To activate a specific mode, use the following command:
ROS_DOMAIN_ID=10 ros2 service call /h1/leg_modes h1_srvs/srv/H1Modes '{"request_data": "stand_switch"}'
Arm Low-Level Control
The predefined arm positions do not include obstacle avoidance for either the robot or its environment.
Important
Ensure that the arms are straight down when powering on the robot. If the orientation is different, it will affect the ROS2 control operation. The arms will initialize and move so that the forearms are facing forward.
To set the arms to their default position, use the following command:
h1_arm_default
Executing arm default command |
H1 arm moving to default position |
Warning
Using the h1_arm_zero command brings the arms to a position that prevents backlash when restarting the ROS2 control driver. This should be done before closing the ROS2 driver if you plan to run the driver again later.
To zero the arms, execute:
h1_arm_zero
Executing arm zero command |
H1 arm moving to zero position |
To set the arms to a T-pose, use:
h1_arm_t

Executing T-pose command |
H1 arm moving to T-pose |
For a sample pose useful for picking objects, use:
h1_arm_pick
Executing pick pose command |
H1 arm moving to pick pose |
Examples of Trajectory Control
Bring Left Arm to Zero Position
To bring the left arm to the zero position, run:
ROS_DOMAIN_ID=10 ros2 action send_goal /left_arm_controller/follow_joint_trajectory control_msgs/action/FollowJointTrajectory -f "{
  trajectory: {
    joint_names: [left_shoulder_pitch_joint,
    left_shoulder_roll_joint, left_shoulder_yaw_joint,
    left_elbow_joint],
    points: [
      { positions: [0.0, 0.0, 0.0, 0.0], time_from_start: { sec: 2 } },
      { positions: [0.5, 0.0, 0.0, 0.1], time_from_start: { sec: 4 } },
    ]
  }
}"
Bring Right Arm to Zero Position
To bring the right arm to the zero position, run:
ROS_DOMAIN_ID=10 ros2 action send_goal /right_arm_controller/follow_joint_trajectory control_msgs/action/FollowJointTrajectory -f "{
  trajectory: {
    joint_names: [right_shoulder_pitch_joint,
    right_shoulder_roll_joint, right_shoulder_yaw_joint,
    right_elbow_joint],
    points: [
      { positions: [0.0, 0.0, 0.0, 0.0], time_from_start: { sec: 2 } },
      { positions: [0.5, 0.0, 0.0, 0.1], time_from_start: { sec: 4 } },
    ]
  }
}"
To perform a final power-off of the arms, use:
h1_arm_zero
Executing trajectory control to zero position |

H1 arm transitioning from T-pose to zero position |
MoveIt2 Integration
To launch the H1 MoveIt2 driver, run:
ros2 launch h1_moveit system.launch.py
This will open MoveIt2, which can be used for various manipulation tasks. Be sure to set a planner, such as TRRT, before planning and executing a motion plan.
Sensors
Depth Cameras
Intel Realsense D435i
Test the native driver via:
ros2 launch realsense2_camera rs_launch.py depth_module.depth_profile:=1280x720x30 pointcloud.enable:=true
This should be running via services and can be controlled via the webserver or systemctl to activate or deactivate it. When turned off you can test via:
ros2 launch h1_depth_camera realsense.launch.py
Depth Camera ZED2i
This should be running via services in the nividia bagpack and can be controlled via the systemctl to activate or deactivate it. When turned off you can test via:
ros2 launch h1_depth_camera zed.launch.py
Lidars
Ouster
This should be running via services and can be controlled via the webserver or systemctl to activate or deactivate it. When turned off you can test via:
ros2 launch h1_lidar ouster.launch.py
GPS
Emlid M2
This should be running via services and can be controlled via the webserver or systemctl to activate or deactivate it. When turned off you can test via:
ros2 launch h1_gps emlid_m2.launch.py
For configuration, the webserver’s VNC can be utilized. Open the browser and navigate to http://192.168.2.15 to configure the emlid M2’s output, RTK settings, Base station connection, etc.
Auxiliary
Depth Cameras
Intel Realsense D435i
The D435i is launched by default with the H1 bringup. To launch the Realsense D435i separately, execute:
ros2 launch h1_depth_camera realsense_d435i.launch.pyThe launch file is configured to enable continuous depth stream information from the Realsense D435i without lag. To further change parameters, modify the configuration in:
h1_depth_camera/launch/realsense_d435i.launch.py
Intel Realsense D435i Normal Output |
Intel Realsense D435i Depth Output |
Lidars
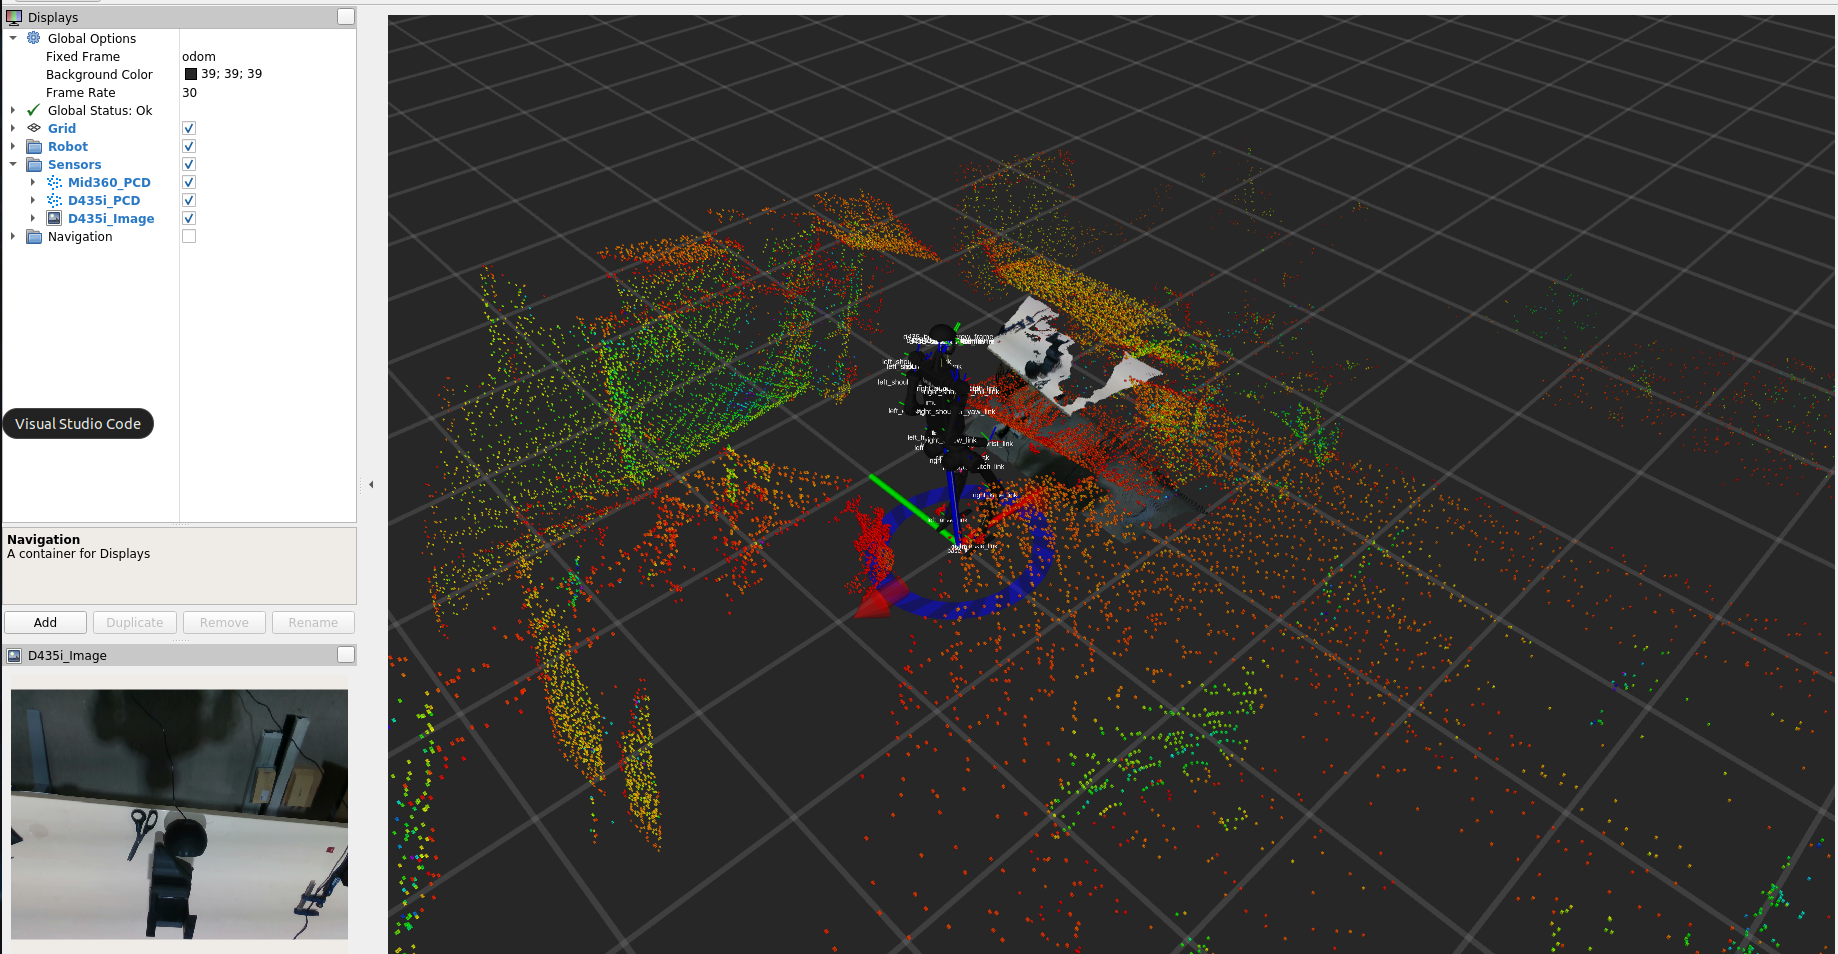
The Mid360 is launched by default with the H1 bringup. To activate the Mid360 Lidar, execute:
ros2 launch h1_livox system.launch.py
Mid360 Lidar Output Visualization in RViz
GPS
Auxiliary
Simulation
Gazebo
ros2 launch h1_gazebo h1_2_fortress_simulation.launch.py
Unitree RL Gym
For sim to real deployment please follow instructions at unitree_rl_gym
Isaac Lab
Please refer to Isaac Lab for training and deployment.
Gazebo
Available in Humble
Isaac Sim
Available in Isaac Lab
Packages
Robot Description
The H1 robot description package is named h1_description. It contains the URDF and mesh files necessary to visualize and simulate the H1 robot in various ROS2 tools.
Twist Mux
The twist mux package for the H1 is named h1_control. It manages multiple velocity command inputs and prioritizes them to ensure smooth and safe robot operation.
EKF Localization
The Extended Kalman Filter (EKF) localization package for the H1 is named h1_control. It fuses sensor data to provide accurate and reliable robot pose estimates.
Debugging
RQT
ROS_DOMAIN_ID=10 ros2 run rqt_gui rqt_gui --ros-args --remap tf:=/h1_unit_238/tf --ros-args --remap tf_static:=/h1_unit_238/tf_static
Dynamic Reqconfigure
From configure select Dynamic Reconfigure
ROS_DOMAIN_ID=10 ros2 run rqt_gui rqt_gui --ros-args --remap tf:=/h1_unit_238/tf --ros-args --remap tf_static:=/h1_unit_238/tf_static
TF
ROS_DOMAIN_ID=10 ros2 run rqt_tf_tree rqt_tf_tree --force-discover --ros-args --remap tf:=/h1_unit_238/tf --ros-args --remap tf_static:=/h1_unit_238/tf_static
ROS_DOMAIN_ID=10 ros2 run tf2_tools view_frames.py --force-discover --ros-args --remap tf:=/h1_unit_238/tf --ros-args --remap tf_static:=/h1_unit_238/tf_static
Debugging Tips
When running RQt GUI with multiple robots in the same network, it’s important to set a unique ROS_DOMAIN_ID for each robot to avoid communication conflicts. You can do this by exporting the ROS_DOMAIN_ID environment variable before launching RQt GUI. For example, to set the domain ID to 10, use the following command:
ROS_DOMAIN_ID=10 ros2 run rqt_gui rqt_gui
This command ensures that RQt GUI communicates with the robot assigned to domain ID 10, preventing interference from other robots on the network.
Dynamic Reconfigure
To adjust parameters on-the-fly using dynamic reconfigure, you can use the following command:
ROS_DOMAIN_ID=10 ros2 run rqt_reconfigure rqt_reconfigure
TF Tree
To visualize the TF tree of the H1 robot, you can use the following command:
ROS_DOMAIN_ID=10 ros2 run rqt_tf_tree rqt_tf_tree --force-discover
Video stream
To view the video stream from the H1’s camera, you can use the following command:
gst-launch-1.0 udpsrc address=230.1.1.1 port=1720 multicast-iface=eth0 ! \
 application/x-rtp, media=video, encoding-name=H264 ! \
 rtph264depay ! queue max-size-buffers=1 ! h264parse ! queue ! avdec_h264 ! \
 videoconvert ! autovideosink
Miscellanious
SDK Examples
cd /opt/mybotshop/04Aug2025_unitree_sdk2/build/
cmake .. && make && sudo make install
cd /opt/mybotshop/04Aug2025_unitree_sdk2/build/bin
./h1_loco_client --network_interface=eth0 --shake_hand
Computer - Robot Synchronization
rsync -avP -t --delete -e ssh src unitree@192.168.123.164://opt/mybotshop
Update System Kernel Cyclone
printf "net.core.rmem_max=33554432\nnet.core.rmem_default=33554432\nnet.core.wmem_max=33554432\nnet.core.wmem_default=33554432\nnet.ipv4.udp_rmem_min=16384\nnet.ipv4.udp_wmem_min=16384\n" | sudo tee /etc/sysctl.d/90-ros2-dds.conf
sudo sysctl --system
Enable Internet - LAN
This enables LAN via the ethernet cable. This has to be connected to a router with internet access
sudo ip link set eth0 down && sudo ip link set eth0 up
sudo dhclient eth0
Computer - Robot Synchronization
rsync -avP -t --delete -e ssh src unitree@192.168.123.164://opt/mybotshop
Low-Level Control
The low-level control for the H1 can be directly accessed via Unitree’s provided examples in their documentation. Running the provided qre_h1 driver with the low-level commands from Unitree examples should work concurrently.
Installation
Installation Robot
Enable Internet by connecting it to a switch with internet
sudo ip link set eth0 down && sudo ip link set eth0 up
sudo dhclient eth0
Switch H1 id with ctrl+h
h1_unit_238
Switch username
sudo hostnamectl set-hostname h1-unit-284-pc-4
Disable redundant B2 slam
sudo systemctl stop unitree_slam.service
sudo systemctl disable unitree_slam.service
sudo rm /lib/systemd/system/unitree_slam.service
Update date and time, ensure you have internet in the robot. The quickest way is using the USB WiFi stick
sudo timedatectl set-timezone Europe/Berlin
sudo date -s "$(wget --method=HEAD -qSO- --max-redirect=0 google.com 2>&1 | sed -n 's/^ *Date: *//p')"
Install ROS2 Humble dev tools
sudo apt update && sudo apt install curl -y
export ROS_APT_SOURCE_VERSION=$(curl -s https://api.github.com/repos/ros-infrastructure/ros-apt-source/releases/latest | grep -F "tag_name" | awk -F\" '{print $4}')
curl -L -o /tmp/ros2-apt-source.deb "https://github.com/ros-infrastructure/ros-apt-source/releases/download/${ROS_APT_SOURCE_VERSION}/ros2-apt-source_${ROS_APT_SOURCE_VERSION}.$(. /etc/os-release && echo $VERSION_CODENAME)_all.deb" # If using Ubuntu derivates use $UBUNTU_CODENAME
sudo dpkg -i /tmp/ros2-apt-source.deb
sudo apt install ros-dev-tools
Create directory for h1 Workspace
sudo mkdir /opt/mybotshop
sudo chown -R unitree:unitree /opt/mybotshop
Clone the repository, copy over to the h1’s PC and run the installer script - Press Y when installing Livox Mid360 - Select gdm3 when prompted in webserver installation
cd /opt/mybotshop/src/mybotshop/ && sudo chmod +x h1_install.sh && ./h1_install.sh
cd /opt/mybotshop/src/mybotshop/h1_webserver && sudo chmod +x webserver_installer.sh && ./webserver_installer.sh
Build unitree sdk
cp -r /opt/mybotshop/src/third_party/unitree/04Aug2025_unitree_sdk2/ /opt/mybotshop
cd /opt/mybotshop/04Aug2025_unitree_sdk2/build
cmake .. && make && sudo make install
Build Kiss ICP
python3 -m pip install --user --upgrade "cmake>=3.24"
export PATH="$HOME/.local/bin:$PATH"
cd /opt/mybotshop && colcon build --symlink-install --packages-select kiss_icp --cmake-args -DCMAKE_POLICY_VERSION_MINIMUM=3.24
Build ros2 workspace
cd /opt/mybotshop && colcon build --symlink-install && source install/setup.bash
Add the following to .bashrc
# MYBOTSHOP
source /opt/mybotshop/install/setup.bash
alias h1_build='cd /opt/mybotshop && colcon build --symlink-install --cmake-args -DCMAKE_BUILD_TYPE=Release && source install/setup.bash'
Increase cyclone kernel
printf "net.core.rmem_max=33554432\nnet.core.rmem_default=33554432\nnet.core.wmem_max=33554432\nnet.core.wmem_default=33554432\nnet.ipv4.udp_rmem_min=16384\nnet.ipv4.udp_wmem_min=16384\n" | sudo tee /etc/sysctl.d/90-ros2-dds.conf
sudo sysctl --system
Run the startup installer - Ensure H1/H1-2 for description in the /opt/mybotshopt/src/mybotshop/h1_bringup/scripts/startup_installer.py
ros2 run h1_bringup startup_installer.py
Installation External
Clone the repository into a ros2_ws and build essential items only via:
colcon build --symlink-install --packages-select h1_description h1_viz && source install/setup.bash
Source and run rviz2
export H1_NS="h1_unit_238"
ros2 launch h1_viz view_robot.launch.py
Installation Robot
Note
This repository should already be available and built on the H1’s Nvidia board if it has been configured by the MYBOTSHOP team.
Clone this repository into the H1’s Nvidia board.
Run the bash install script.
Build the repository by executing the following command:
colcon build --symlink-install && source install/setup.bashAfter building, remember to source the install/setup.bash. Ensure you add the source command to your workspace in the .bashrc file.
Installation External
Note
Important: This process is necessary to enable Unitree SDK’s DDS topics to appear. Without these steps, only the MYBOTSHOP package ROS2 topics will be visible. You can skip this procedure if you do not need the Unitree topics.
Part 1
Navigate to the unitree_sdk2 folder inside the thirdparty directory and execute the installation script:
cd thirdparty/unitree_sdk2
sudo bash install.sh
Build the examples:
rm -rf build && mkdir build && cd build && cmake .. && makeYou can now directly run high-level and low-level examples as explained in the Unitree H1 SDK documentation.
Part 2
Requirements: ROS2 Foxy on Ubuntu 20.04.
Install the necessary dependencies:
sudo apt install ros-$ROS_DISTRO-rmw-cyclonedds-cpp ros-$ROS_DISTRO-rosidl-generator-dds-idl -yUnsource ROS Foxy in the terminal (i.e., by commenting out the sourcing command in the .bashrc file).
Build Cyclone DDS:
colcon build --packages-select cycloneddsInstall other dependencies by running the provided install script:
sudo chmod +x h1_install.bash && ./h1_install.bashSource the environment:
source install/setup.bash
source /opt/ros/foxy/setup.bash
Build the repository:
colcon build --symlink-install
Network Setup
Connect to the 123 network using a static IP (No DHCP, as it disrupts the network).
Note down the network interface name (e.g., eth0).
Edit and source the h1_bringup/config/setup.bash file with the corrected network interface. For example:
#!/bin/bash
echo "Setup Unitree ROS2 environment"
source /opt/ros/foxy/setup.bash
source $HOME/ros2_ws/install/setup.bash

export RMW_IMPLEMENTATION=rmw_cyclonedds_cpp
export CYCLONEDDS_URI='<CycloneDDS><Domain><General><Interfaces>
                           <NetworkInterface name="eth0" priority="default" multicast="default" />
                        </Interfaces></General></Domain></CycloneDDS>'
Add the above to your .bashrc file for persistence.
Verification
Check the available ROS2 topics:
ros2 topic listEcho a specific topic (e.g., /lowstate):
ros2 topic echo /lowstate