Attention
Read this document carefully! In case of doubt, consult specialists, experts, or manufacturers of the assemblies used. The robot must not be operated before all uncertainties are clarified. For further assistance, refer to the guides below or contact a specialist.
Important: Contact information is available in the RMA/ Support Section.
Warning: Do not allow untrained individuals or those unfamiliar with robotics or these instructions to operate the robot. Improper use of robots is dangerous.
This guide will walk you through the process of setting up and configuring the Unitree H1 robot, including network configurations, SSH access, internet setup, software installation and various operational controls. Follow the steps below carefully to ensure proper operation.
Robot Interface
Instructions for interfacing with the robot using Ubuntu 20.04 and ROS2 Foxy.
This procedure should be followed after successfully setting up and pairing with the H1 robot. Additionally, all of the H1’s functionality should be verified through the accompanying app before proceeding.
The Ethernet port, located beneath the right arm of the H1 (the fourth port from the top), can be used to establish communication via LAN. However, a special adapter cable is required, as a standard Ethernet cable cannot be inserted directly into the port.
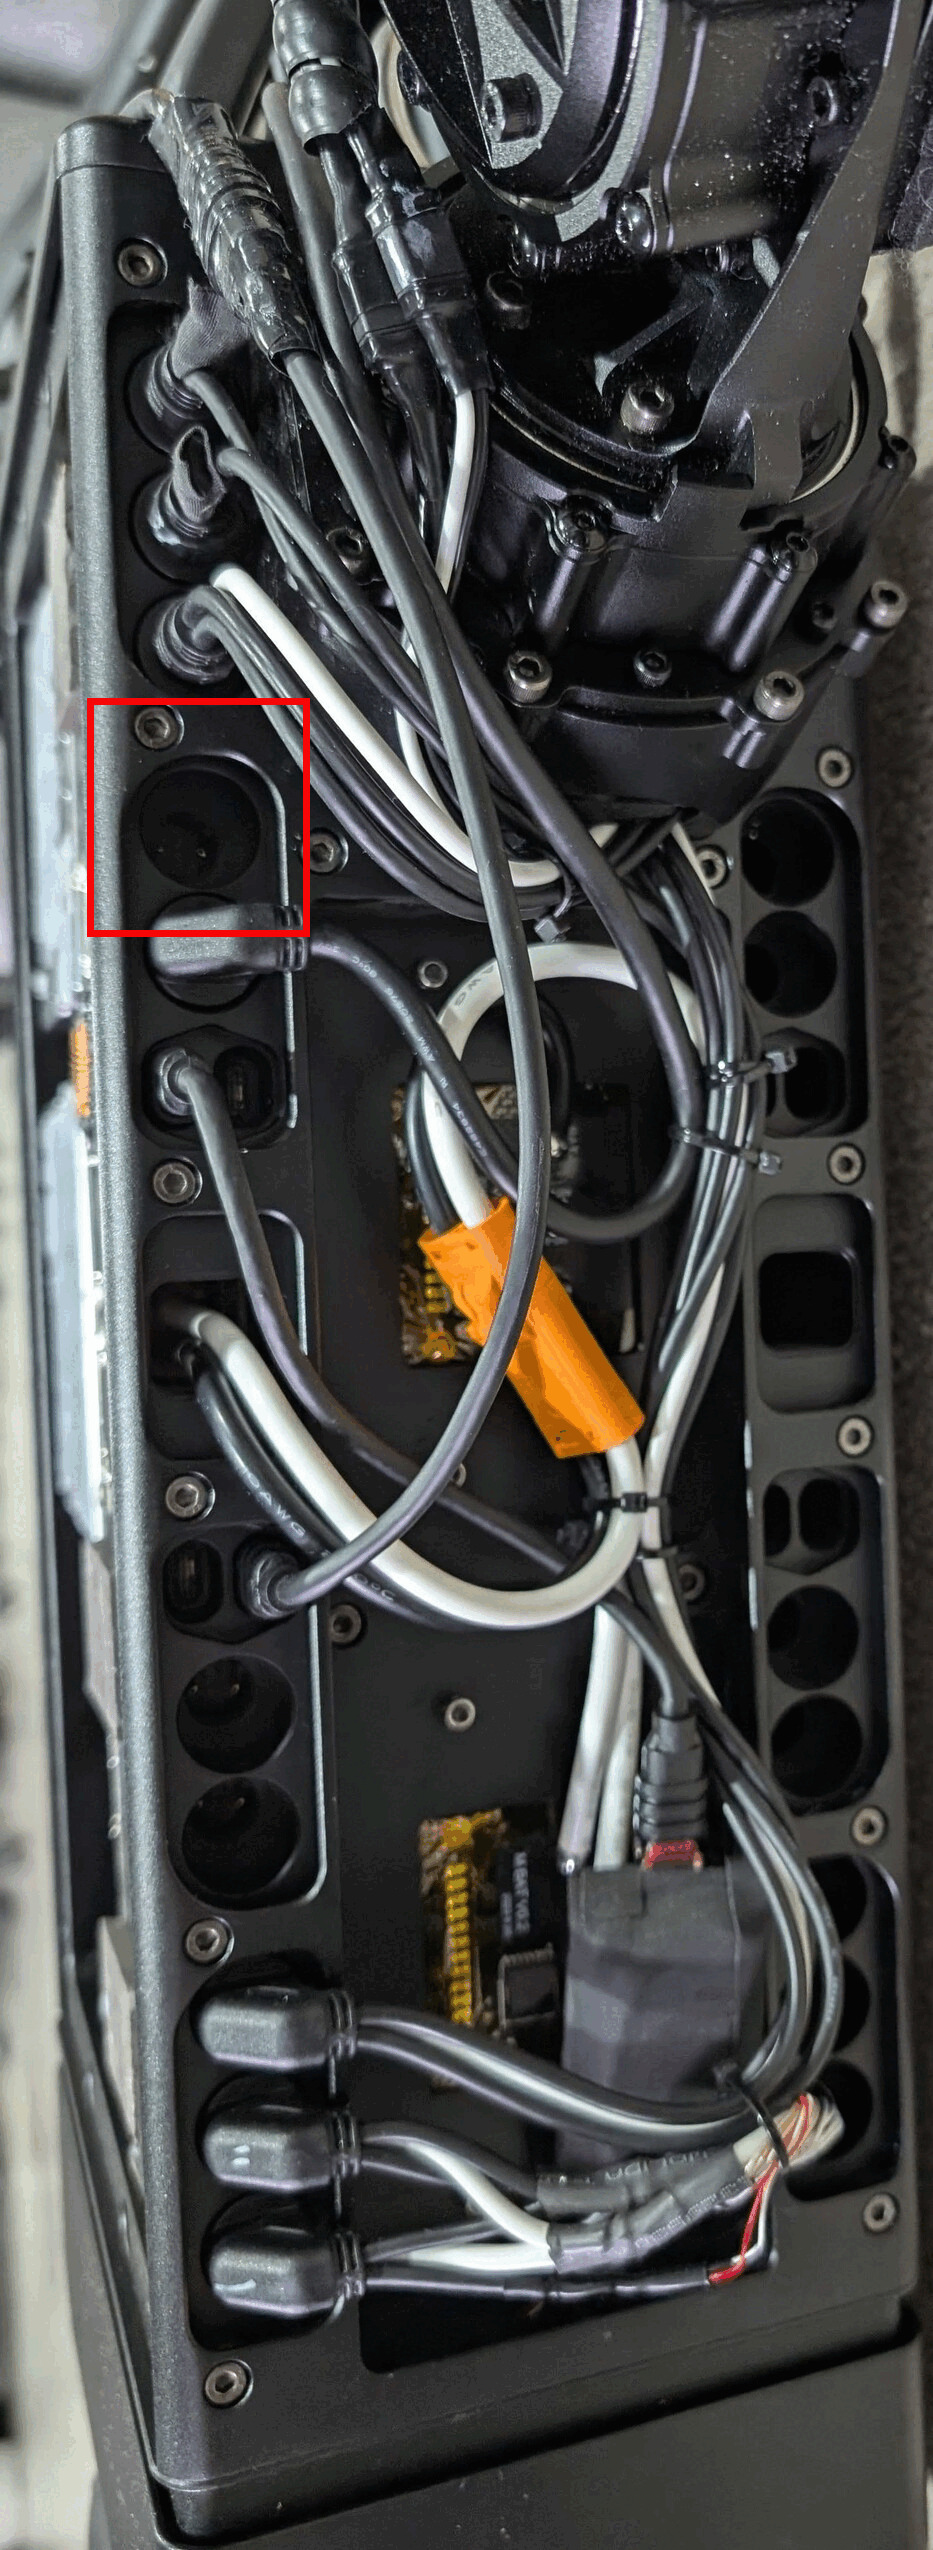
Port Location on H1 (Real Robot) |
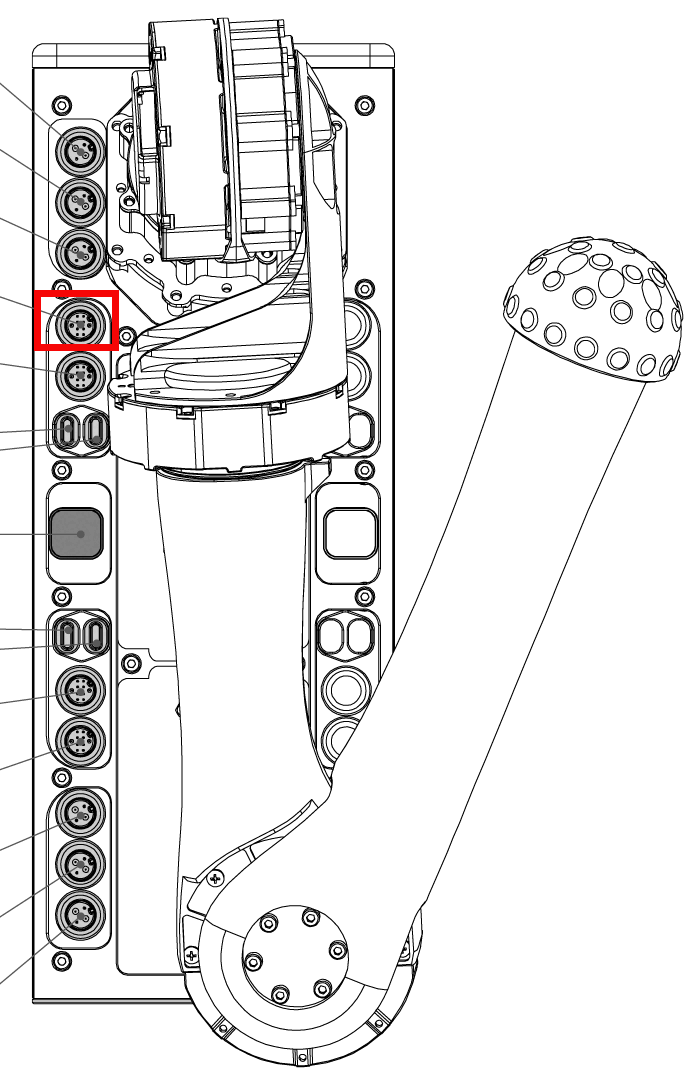
Port Location (Layout Diagram) |
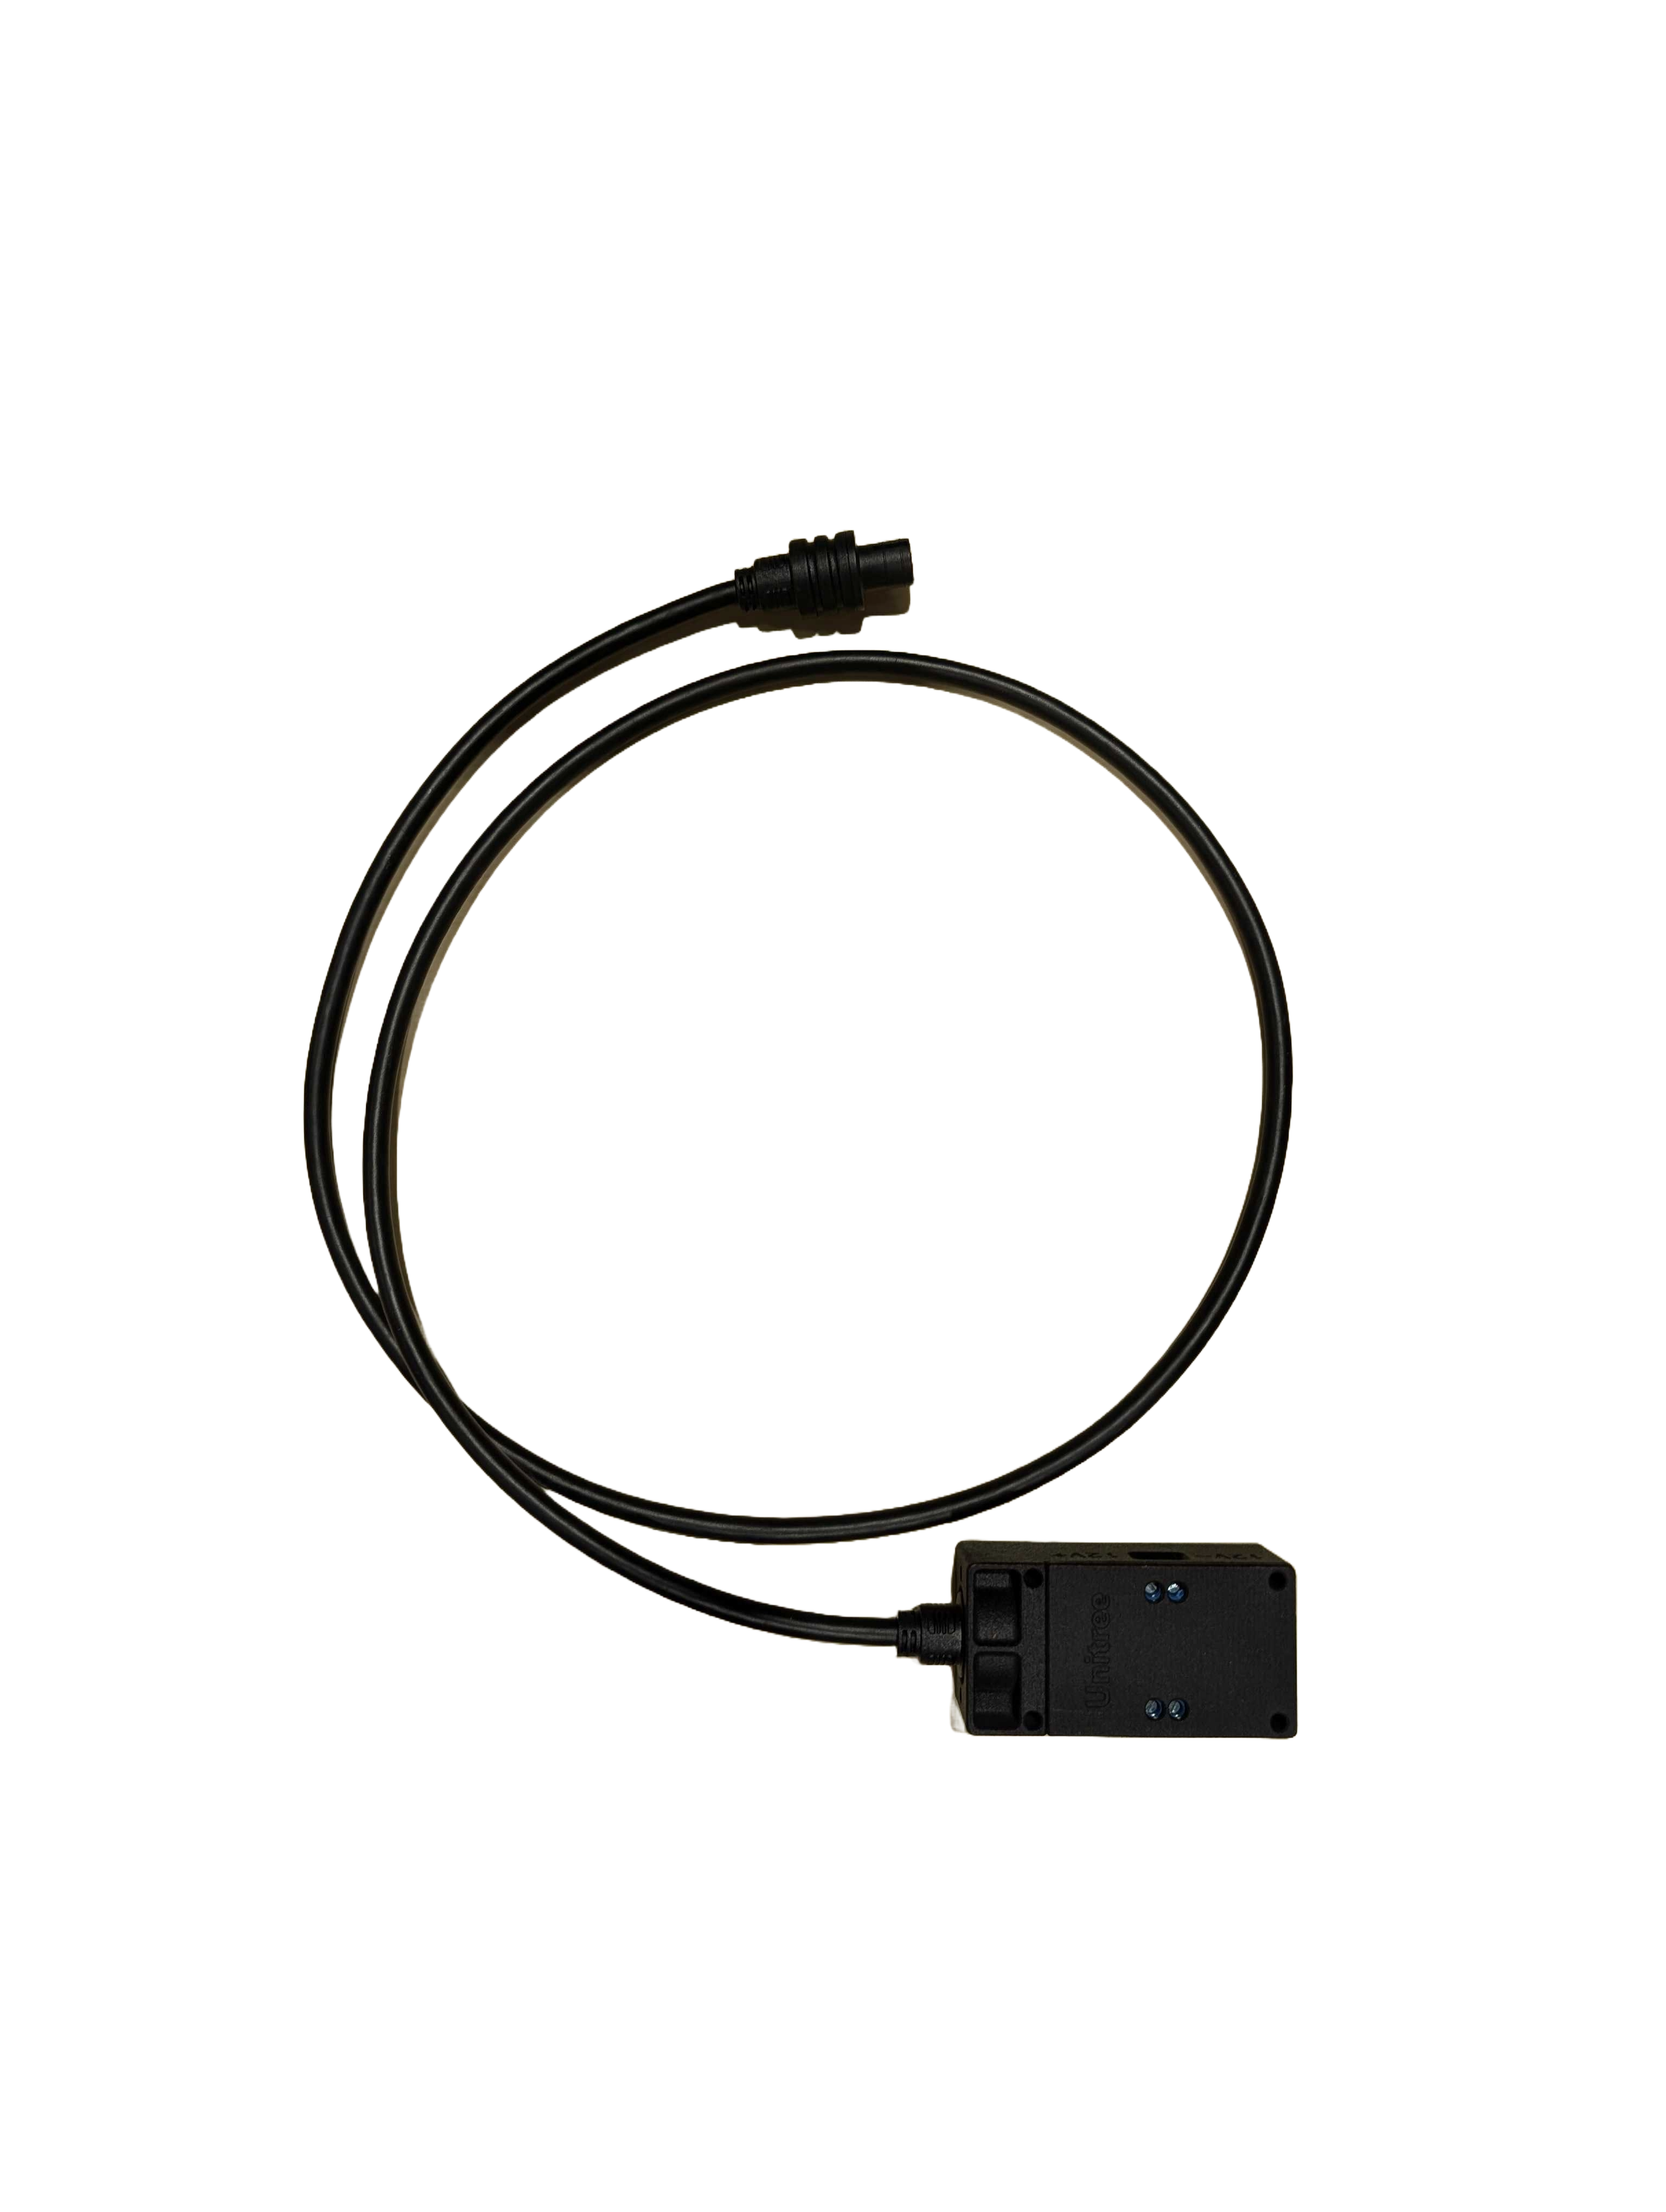
Ethernet Adapter |
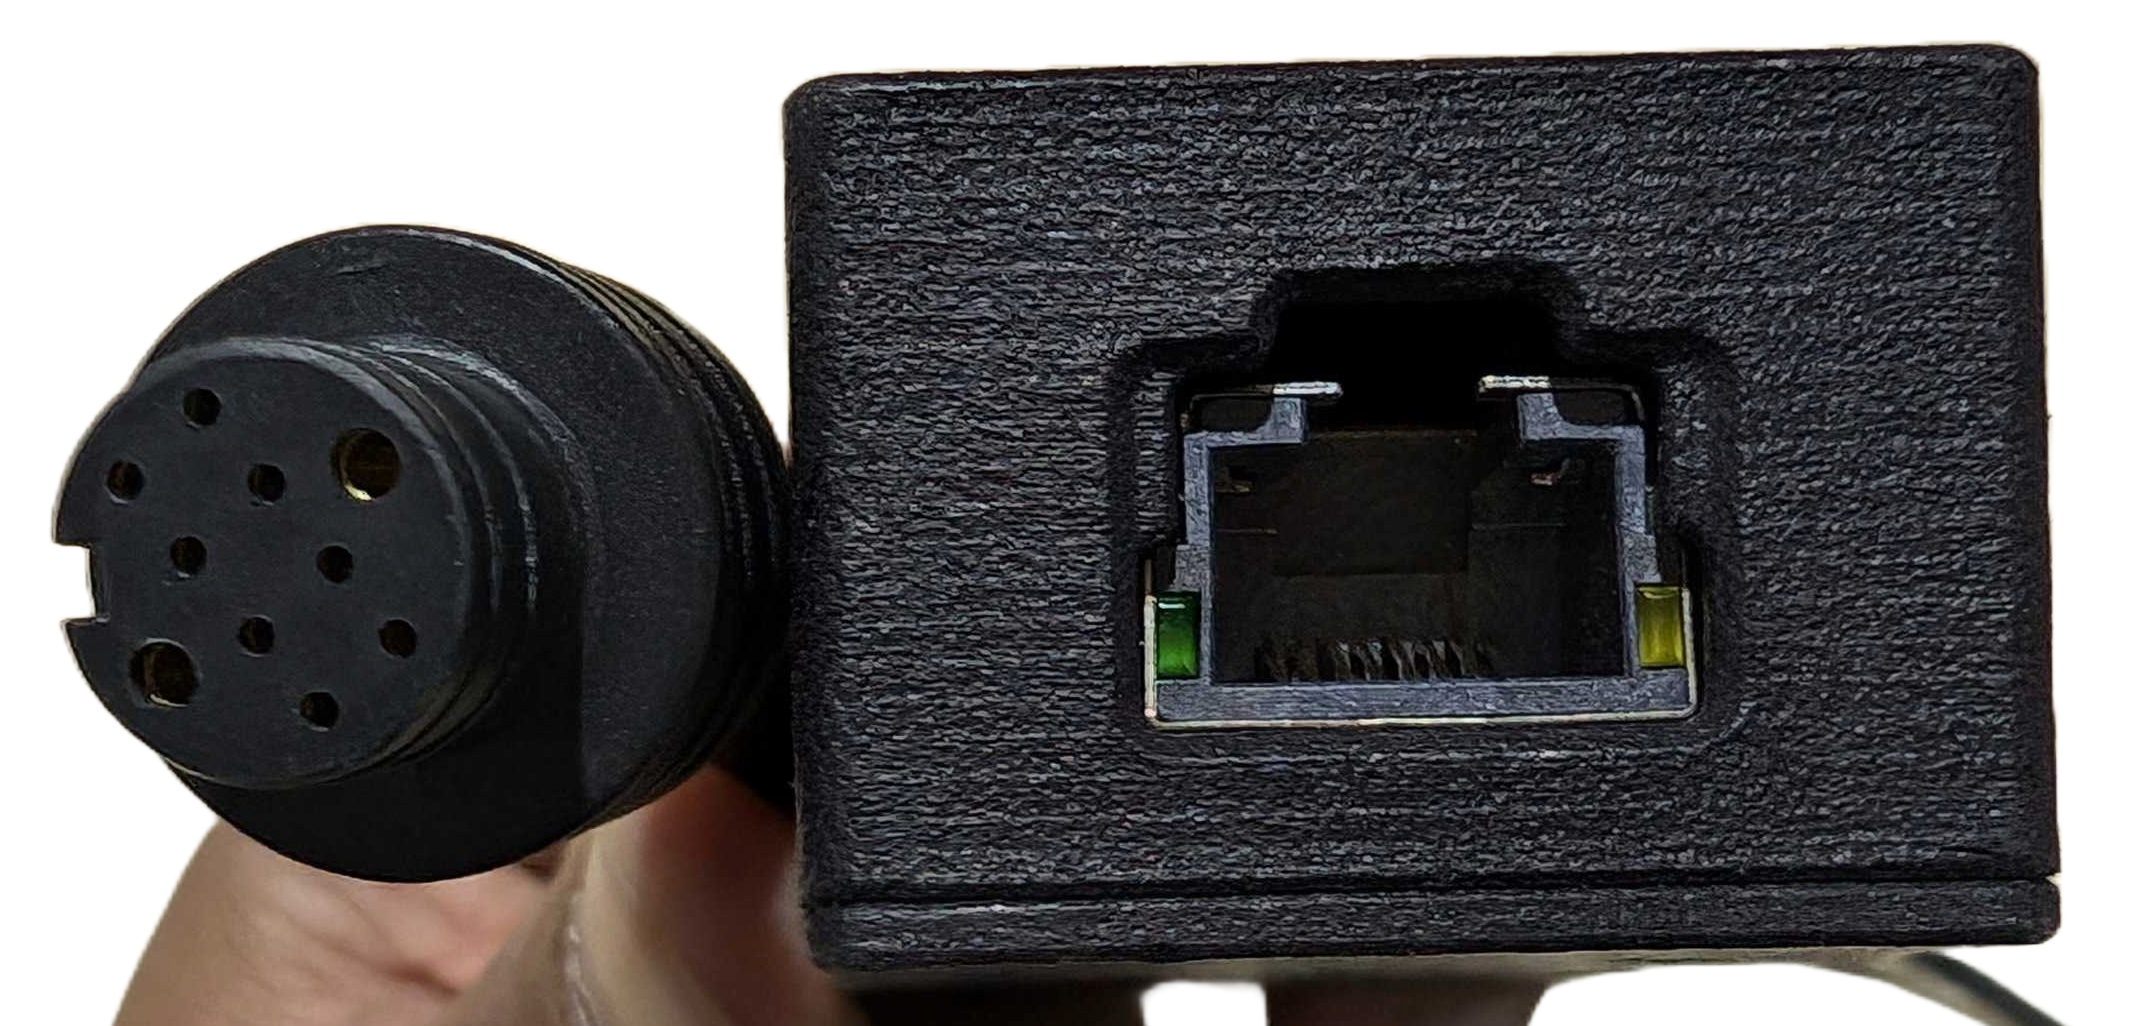
Ethernet Adapter Cable Ends |
Network Setup
To configure the robot’s network for the first time, you need to connect using a LAN cable.
To create a static connection on your PC (not on the robot), follow these steps in Ubuntu:
Go to Settings → Network, then click on the + button to create a new connection.
In the IPv4 settings, change the connection type to Manual.
Set the Address to 192.168.123.51 and the Netmask to 24.
Click Save, then restart your network.
After successfully connecting, check the host’s local IP by typing the following command in the host PC’s terminal:
ifconfig
Now, ping the robot by entering:
ping 192.168.123.162
To access the robot via SSH, use the following command:
ssh -X unitree@192.168.123.162
The default password is:
Unitree0408
IP Addresses
Robot |
IP Address |
Password |
|---|---|---|
H1 MCU |
192.168.123.161 |
|
H1 External |
192.168.123.162 |
123 |
H1 Livox Mid360 |
192.168.123.120 |
Note
Sometimes other networks can cause disruptions when connecting to the H1. It is best to have only your connection to the robot active and disable all others.
Quick-Setup
Powering-on
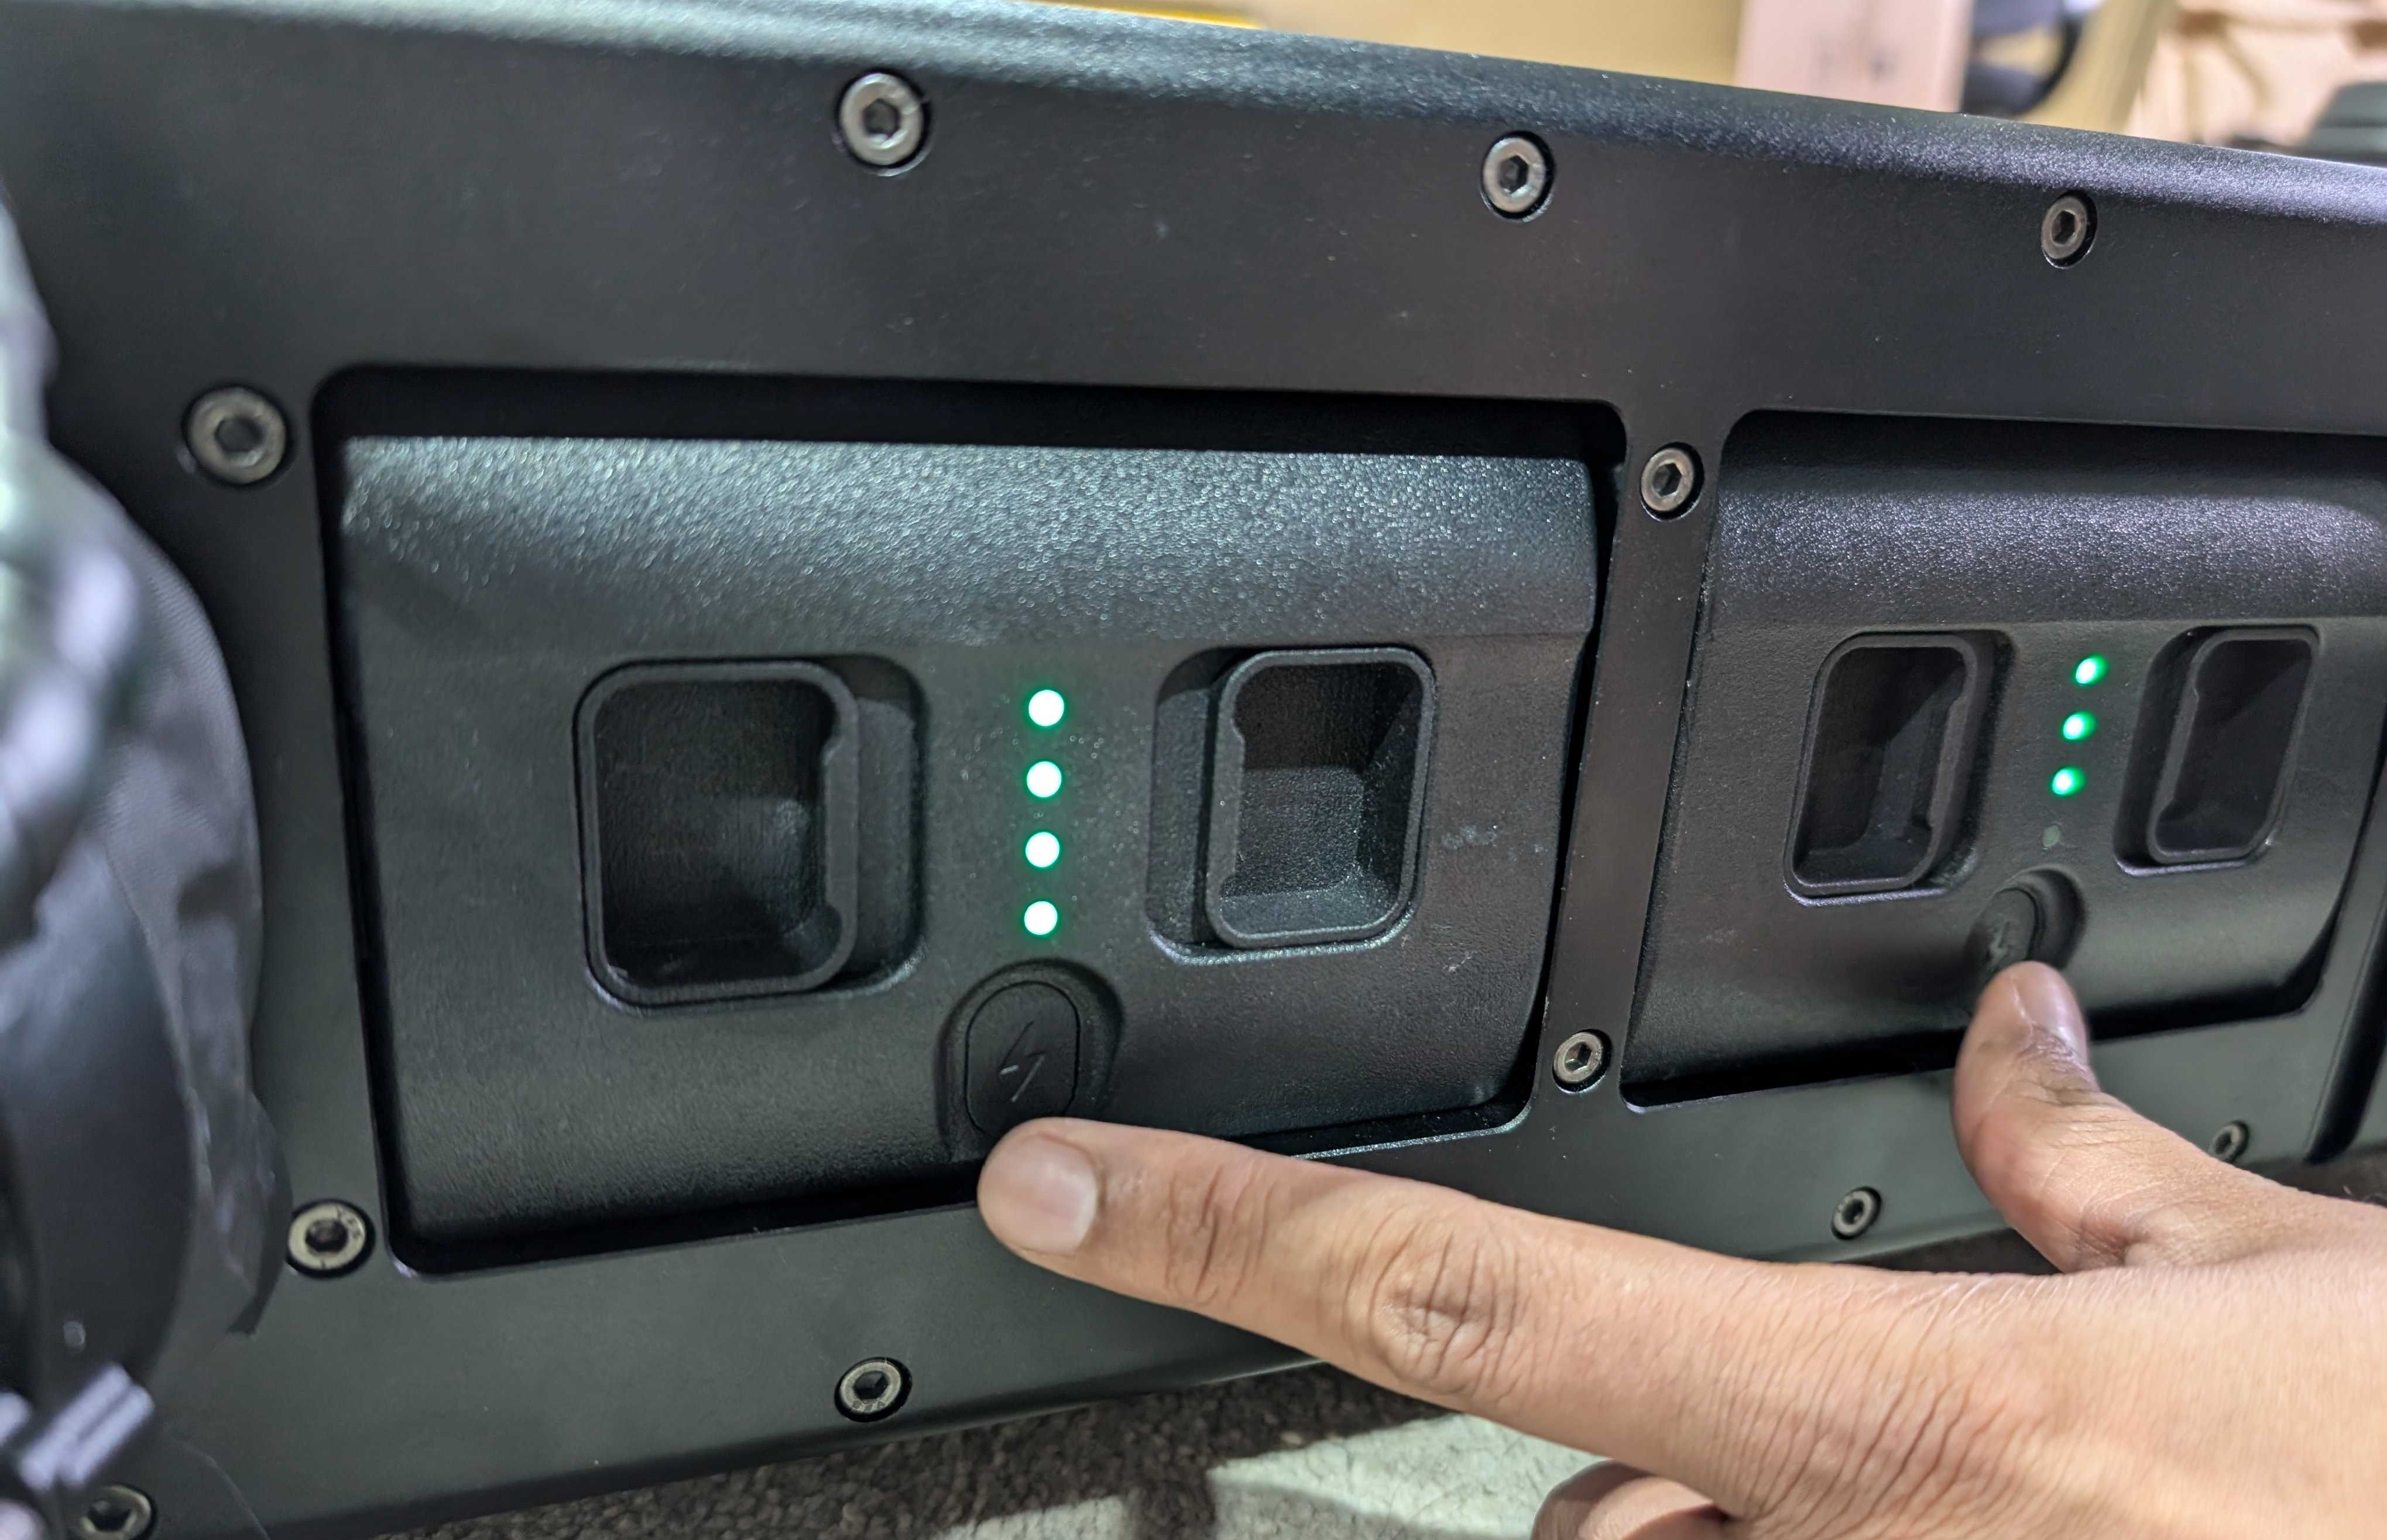
Battery Power Button: Use the buttons on both batteries to power on the robot.
To power on the H1 robot, press the power button on both batteries simultaneously once, and then press and hold for 3 seconds to start the robot.
The battery compartments are located beneath the left arm of the robot.
Similarly, to turn off the robot, press the power button on both batteries simultaneously once, and then press and hold for 3 seconds to turn off the robot.
Note
Please be cautious with battery consumption. Continuously monitor the battery levels. If any battery is depleted, the robot will fall.
Robot Control Setup
First, connect to the H1 as described in the Robot Interface section.
Next, open multiple SSH sessions into the H1 using the following command:
ssh -X unitree@192.168.123.162Verify that the robot is processing information by typing the following command in one of the SSH sessions:
ros2 topic echo /lowstate
If data is displayed, it indicates that the Unitree drivers are running.
Drivers Setup
All ROS2 drivers for the H1 developed by MYBOTSHOP operate with the environment variable ROS_DOMAIN_ID=10. To start the custom Mybotshop ROS2 drivers for the H1, run the following command:
Note
Please ensure that the robot’s arms are straight down when you power on the robot. If the arms are in a different orientation, it may affect the ROS2 control operations.
ros2 launch h1_bringup system.launch.py
This command starts the driver for operating the H1 in high-level mode for the legs and arms.
Important
The arms will initialize and move so that the forearms are facing forward.
The H1 ROS2 driver includes the following components:
Domain Bridge
Joint States
Robot Description
Arm Control
Leg Control (High-level)
Inertial Measurement Unit Publisher
Sensor Fusion
Twist Mux
Logitech F710 Control
D435i Depth Camera Driver
Livox Mid360 LiDAR Driver
2D Scanner
Visualization Tools
You can view the H1’s current state by entering the following command in one of the SSH sessions:
ros2 launch h1_viz view_robot.launch.py
H1 Robot Visualization in RViz
Teleoperation
To teleoperate the H1, run the following command in one of the SSH sessions:
ROS_DOMAIN_ID=10 ros2 run teleop_twist_keyboard teleop_twist_keyboard
Steamdeck Integration
Important
The Lidar data and camera stream are dependent on the DDS configuration and the WiFi dongle being used.
Setup Instructions:
Before launching the H1 bringup, run the following command on the H1:
ros2_wifiLaunch the system:
ros2 launch h1_bringup system.launch.pyClick on the joystick controller icon on the Steamdeck to access controls.
Controls:
Leg Control:
Slow Movement: L1 + Left Joystick
Right Movement: R1 + Left Joystick
Arm Control:
To be announced (TBA). This can be modified using the h1_steamdeck libjoy.
Leg Control Mode
The following H1 modes are available via ROS2 services:
- damp
- stand_switch
- increase_swing_height
- decrease_swing_height
- enable_ctrl
Note
Pressing the Tab key on the keyboard will autocomplete the service request.
Example of Activating a Mode
To activate a specific mode, use the following command:
ROS_DOMAIN_ID=10 ros2 service call /h1/leg_modes h1_srvs/srv/H1Modes '{"request_data": "stand_switch"}'
Arm Low-Level Control
The predefined arm positions do not include obstacle avoidance for either the robot or its environment.
Important
Ensure that the arms are straight down when powering on the robot. If the orientation is different, it will affect the ROS2 control operation. The arms will initialize and move so that the forearms are facing forward.
To set the arms to their default position, use the following command:
h1_arm_default
Executing arm default command |
H1 arm moving to default position |
Warning
Using the h1_arm_zero command brings the arms to a position that prevents backlash when restarting the ROS2 control driver. This should be done before closing the ROS2 driver if you plan to run the driver again later.
To zero the arms, execute:
h1_arm_zero
Executing arm zero command |
H1 arm moving to zero position |
To set the arms to a T-pose, use:
h1_arm_t

Executing T-pose command |
H1 arm moving to T-pose |
For a sample pose useful for picking objects, use:
h1_arm_pick
Executing pick pose command |
H1 arm moving to pick pose |
Examples of Trajectory Control
Bring Left Arm to Zero Position
To bring the left arm to the zero position, run:
ROS_DOMAIN_ID=10 ros2 action send_goal /left_arm_controller/follow_joint_trajectory control_msgs/action/FollowJointTrajectory -f "{
  trajectory: {
    joint_names: [left_shoulder_pitch_joint,
    left_shoulder_roll_joint, left_shoulder_yaw_joint,
    left_elbow_joint],
    points: [
      { positions: [0.0, 0.0, 0.0, 0.0], time_from_start: { sec: 2 } },
      { positions: [0.5, 0.0, 0.0, 0.1], time_from_start: { sec: 4 } },
    ]
  }
}"
Bring Right Arm to Zero Position
To bring the right arm to the zero position, run:
ROS_DOMAIN_ID=10 ros2 action send_goal /right_arm_controller/follow_joint_trajectory control_msgs/action/FollowJointTrajectory -f "{
  trajectory: {
    joint_names: [right_shoulder_pitch_joint,
    right_shoulder_roll_joint, right_shoulder_yaw_joint,
    right_elbow_joint],
    points: [
      { positions: [0.0, 0.0, 0.0, 0.0], time_from_start: { sec: 2 } },
      { positions: [0.5, 0.0, 0.0, 0.1], time_from_start: { sec: 4 } },
    ]
  }
}"
To perform a final power-off of the arms, use:
h1_arm_zero
Executing trajectory control to zero position |

H1 arm transitioning from T-pose to zero position |
MoveIt2 Integration
To launch the H1 MoveIt2 driver, run:
ros2 launch h1_moveit system.launch.py
This will open MoveIt2, which can be used for various manipulation tasks. Be sure to set a planner, such as TRRT, before planning and executing a motion plan.
Low-Level Control
The low-level control for the H1 can be directly accessed via Unitree’s provided examples in their documentation. Running the provided qre_h1 driver with the low-level commands from Unitree examples should work concurrently.
SLAM Setup
Note
This section is currently under development. We are working diligently to provide you with comprehensive and detailed instructions for setting up SLAM with the H1 robot. We appreciate your patience and understanding during this process. Stay tuned for updates!
Drivers Launch
Launch the H1 ROS driver that communicates and publishes the state of the robot joints:
ros2 launch h1_bringup system.launch.py
Intel Realsense D435i
The D435i is launched by default with the H1 bringup. To launch the Realsense D435i separately, execute:
ros2 launch h1_depth_camera realsense_d435i.launch.pyThe launch file is configured to enable continuous depth stream information from the Realsense D435i without lag. To further change parameters, modify the configuration in:
h1_depth_camera/launch/realsense_d435i.launch.py
Intel Realsense D435i Normal Output |
Intel Realsense D435i Depth Output |
Mid360 Lidar
The Mid360 is launched by default with the H1 bringup. To activate the Mid360 Lidar, execute:
ros2 launch h1_livox system.launch.py
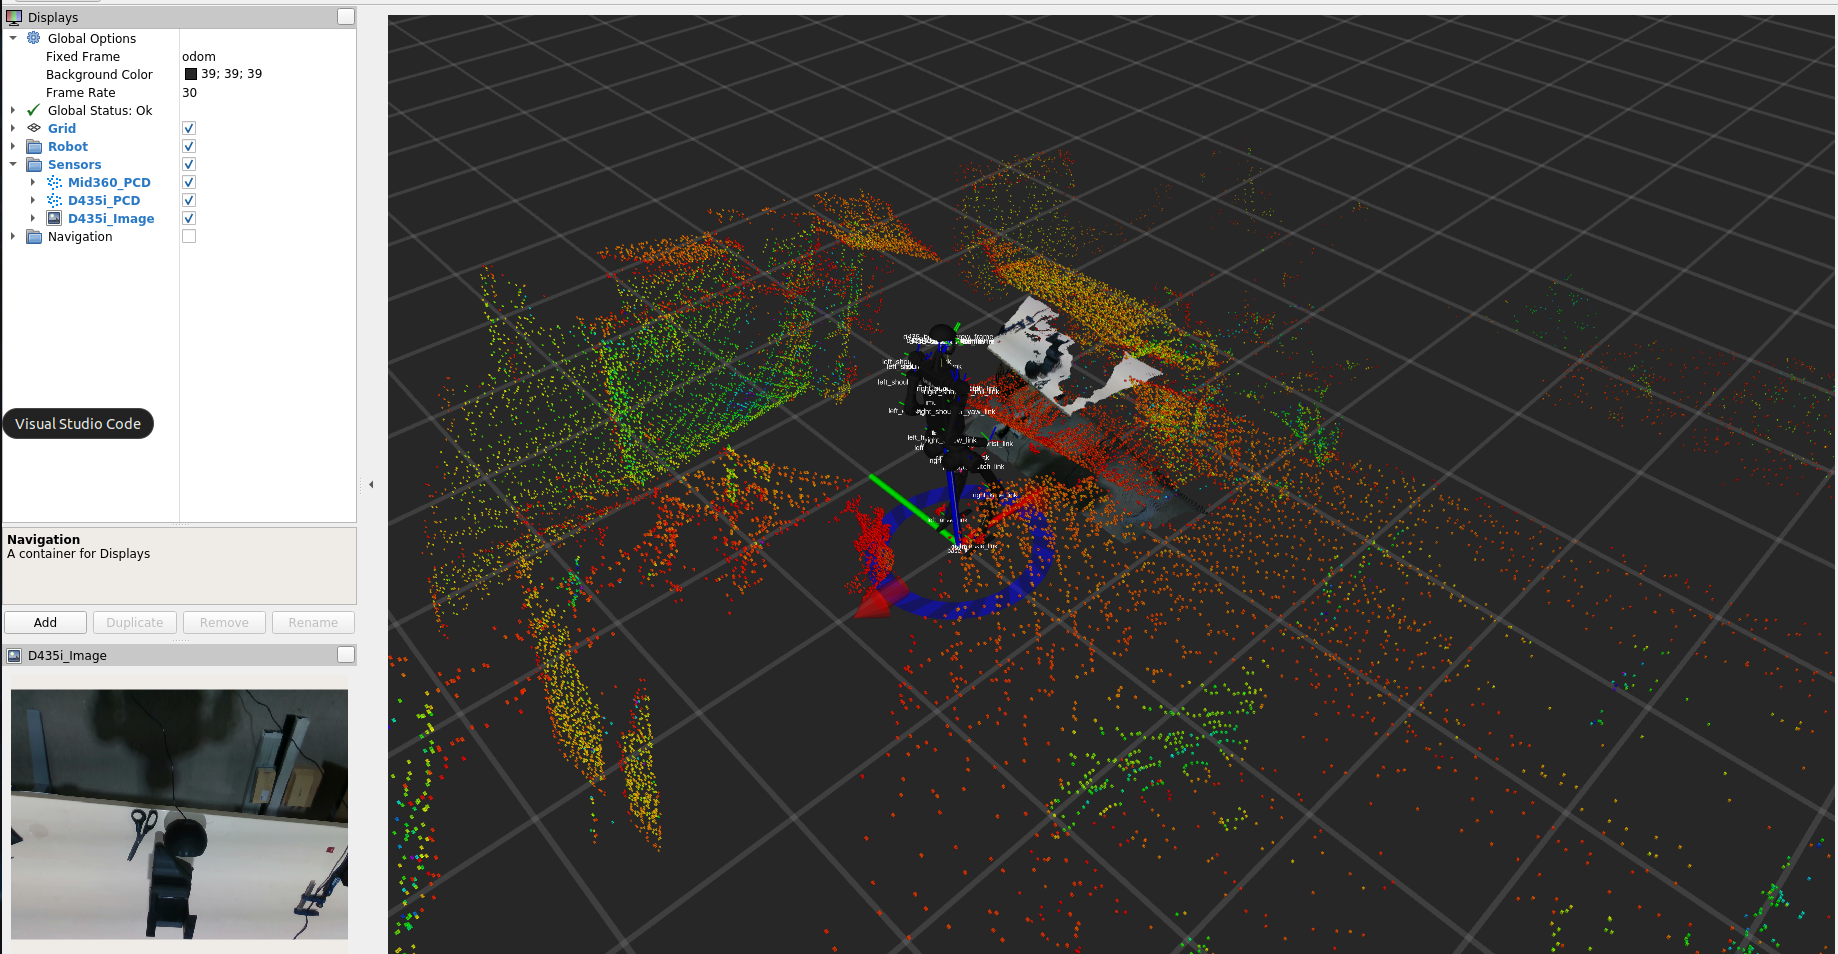
Mid360 Lidar Output Visualization in RViz
MoveIt2 Launch
Launch MoveIt2 for robotic manipulation tasks:
ros2 launch h1_moveit system.launch.py
Nvidia Installation
Note
This repository should already be available and built on the H1’s Nvidia board if it has been configured by the MYBOTSHOP team.
Clone this repository into the H1’s Nvidia board.
Run the bash install script.
Build the repository by executing the following command:
colcon build --symlink-install && source install/setup.bashAfter building, remember to source the install/setup.bash. Ensure you add the source command to your workspace in the .bashrc file.
Unitree SDK Installation (Host PC)
Note
Important: This process is necessary to enable Unitree SDK’s DDS topics to appear. Without these steps, only the MYBOTSHOP package ROS2 topics will be visible. You can skip this procedure if you do not need the Unitree topics.
Part 1
Navigate to the unitree_sdk2 folder inside the thirdparty directory and execute the installation script:
cd thirdparty/unitree_sdk2
sudo bash install.sh
Build the examples:
rm -rf build && mkdir build && cd build && cmake .. && makeYou can now directly run high-level and low-level examples as explained in the Unitree H1 SDK documentation.
Part 2
Requirements: ROS2 Foxy on Ubuntu 20.04.
Install the necessary dependencies:
sudo apt install ros-$ROS_DISTRO-rmw-cyclonedds-cpp ros-$ROS_DISTRO-rosidl-generator-dds-idl -yUnsource ROS Foxy in the terminal (i.e., by commenting out the sourcing command in the .bashrc file).
Build Cyclone DDS:
colcon build --packages-select cycloneddsInstall other dependencies by running the provided install script:
sudo chmod +x h1_install.bash && ./h1_install.bashSource the environment:
source install/setup.bash
source /opt/ros/foxy/setup.bash
Build the repository:
colcon build --symlink-install
Network Setup
Connect to the 123 network using a static IP (No DHCP, as it disrupts the network).
Note down the network interface name (e.g., eth0).
Edit and source the h1_bringup/config/setup.bash file with the corrected network interface. For example:
#!/bin/bash
echo "Setup Unitree ROS2 environment"
source /opt/ros/foxy/setup.bash
source $HOME/ros2_ws/install/setup.bash

export RMW_IMPLEMENTATION=rmw_cyclonedds_cpp
export CYCLONEDDS_URI='<CycloneDDS><Domain><General><Interfaces>
                           <NetworkInterface name="eth0" priority="default" multicast="default" />
                        </Interfaces></General></Domain></CycloneDDS>'
Add the above to your .bashrc file for persistence.
Verification
Check the available ROS2 topics:
ros2 topic listEcho a specific topic (e.g., /lowstate):
ros2 topic echo /lowstate