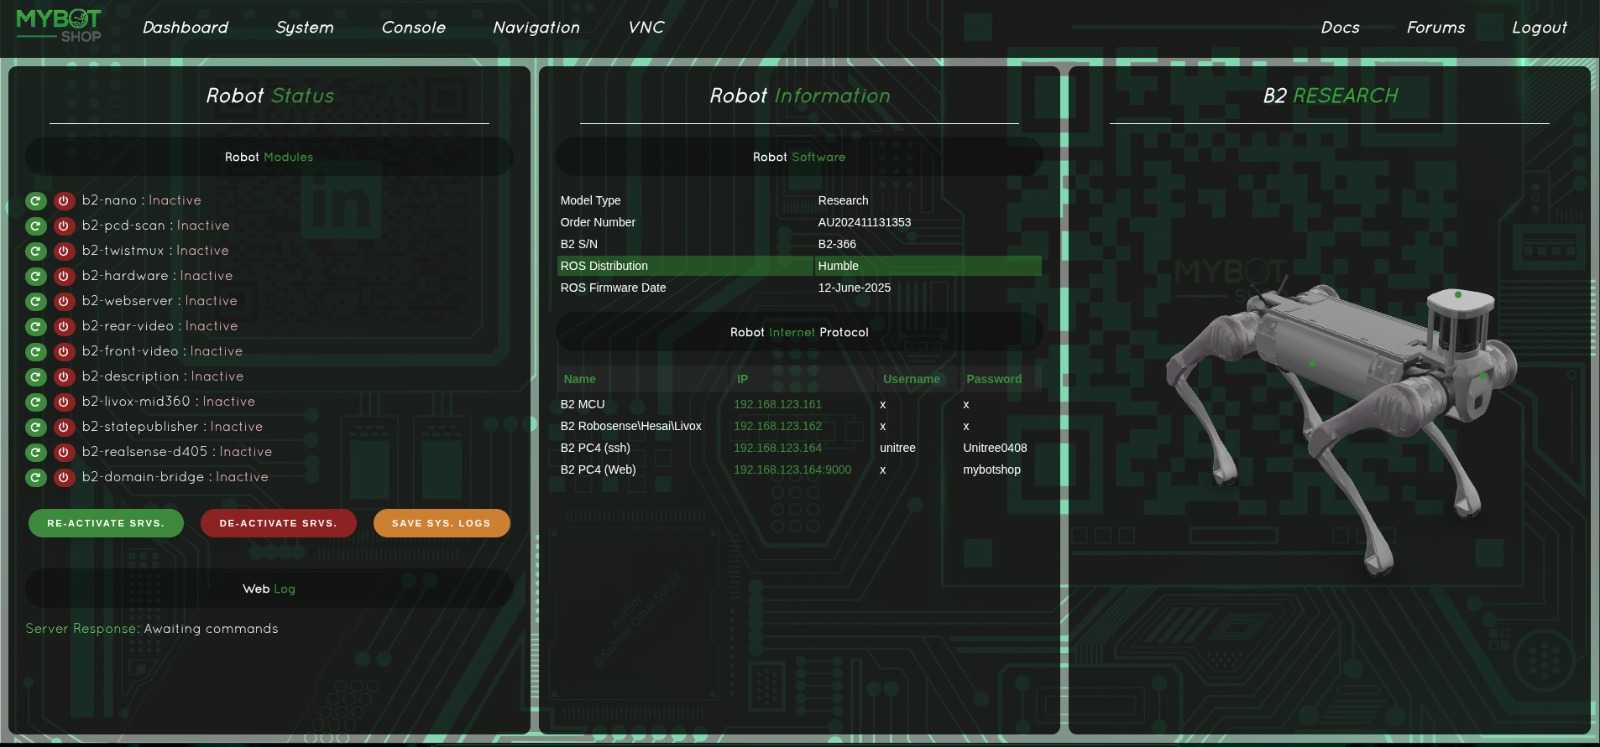
B2 Network Interface
B2 IP Addresses
Name |
IP Address |
Username |
Password |
|---|---|---|---|
B2 MCU |
192.168.123.161 |
x |
x |
B2 Robosense Lidar |
192.168.123.162 |
x |
x |
B2 Onboard PC |
192.168.123.164 |
unitree |
Unitree0408 |
IP Reference
192.168.123.161→ B2 MCU192.168.123.164→ B2 Auxiliary PC (LAN only)
Note
This guide describes how to interface with the B2 robot using Ubuntu 20.04 and ROS2 Humble.
Important
Make sure B2 Edu is fully set up, paired, and verified through the app.
Static Network Connection
To configure the network initially:
Connect your PC to the B2 using a LAN cable.
In Ubuntu Settings → Network, click + to add a new connection.
In IPv4 settings, set the method to Manual: - Address: 192.168.123.51 - Netmask: 24
Save and restart your network.
To verify the connection:
ifconfig
Then ping the robot:
ping 192.168.123.164
To SSH into the B2:
ssh -X unitree@192.168.123.164
Default password:
Unitree0408
Note
It is recommended to disable all other networks while connecting to B2 to avoid interference.
Network Connection
Connect via LAN:
ssh -X unitree@192.168.123.164
B2 Quick Start
B2 Drivers Startup
Note
Drivers should already be configured by the MBS-Team.
To launch RViz:
ros2 launch b2_viz view_robot.launch.py
B2 Tele-operation
To control the B2 using keyboard teleoperation (replace b2_unit_001 with the correct unit name):
ROS_DOMAIN_ID=10 ros2 run teleop_twist_keyboard teleop_twist_keyboard \
cmd_vel:=/b2_unit_001/hardware/cmd_vel

ROS_DOMAIN_ID=10 ros2 run teleop_twist_keyboard teleop_twist_keyboard \
cmd_vel:=/b2_unit_001/controls/cmd_vel
B2 Mode Activation
Warning
At startup, only the webserver is active. Please click Reactivate Services to enable all functionalities.
Once reactivated, the robot will sit and then stand up — transitioning from AI Mode to Sports Mode.
Be cautious: Sports Mode is very fast and responsive.
Available B2 modes (via ROS2 services):
damp
stand_up
stand_down
recovery
stop_move
gait_idle
gait_trot
gait_trot_running
gait_visualwalk
gait_flatwalk
speed_low
speed_high
body_height_low
body_height_mid
body_height_high
Modes are defined in: b2_platform > src > b2_highroscontrol.cpp
To activate a mode:
ROS_DOMAIN_ID=10 ros2 service call /b2_unit_001/hardware/modes \
b2_srvs/srv/B2Modes "{request_data: 'stand_up'}"
To deactivate (stand down):
ROS_DOMAIN_ID=10 ros2 service call /b2_unit_001/hardware/modes \
b2_srvs/srv/B2Modes "{request_data: 'stand_down'}"
Note
stand_up and stand_down have been verified. Please refer to Unitree documentation for details on other modes.
B2 Sensors
Realsense D435i
The D435i must be manually connected from the main PC to PC4.
It is off by default.
To launch:
ros2 launch b2_depth_camera realsense_d435i.launch.py
Note
The Realsense D405 is also off by default.
Realsense Configuration
The launch file enables continuous depth streaming without lag.
To modify parameters, update:
b2_depth_camera/launch/realsense_d4XX.launch.py.launch.py
B2 ROS Packages
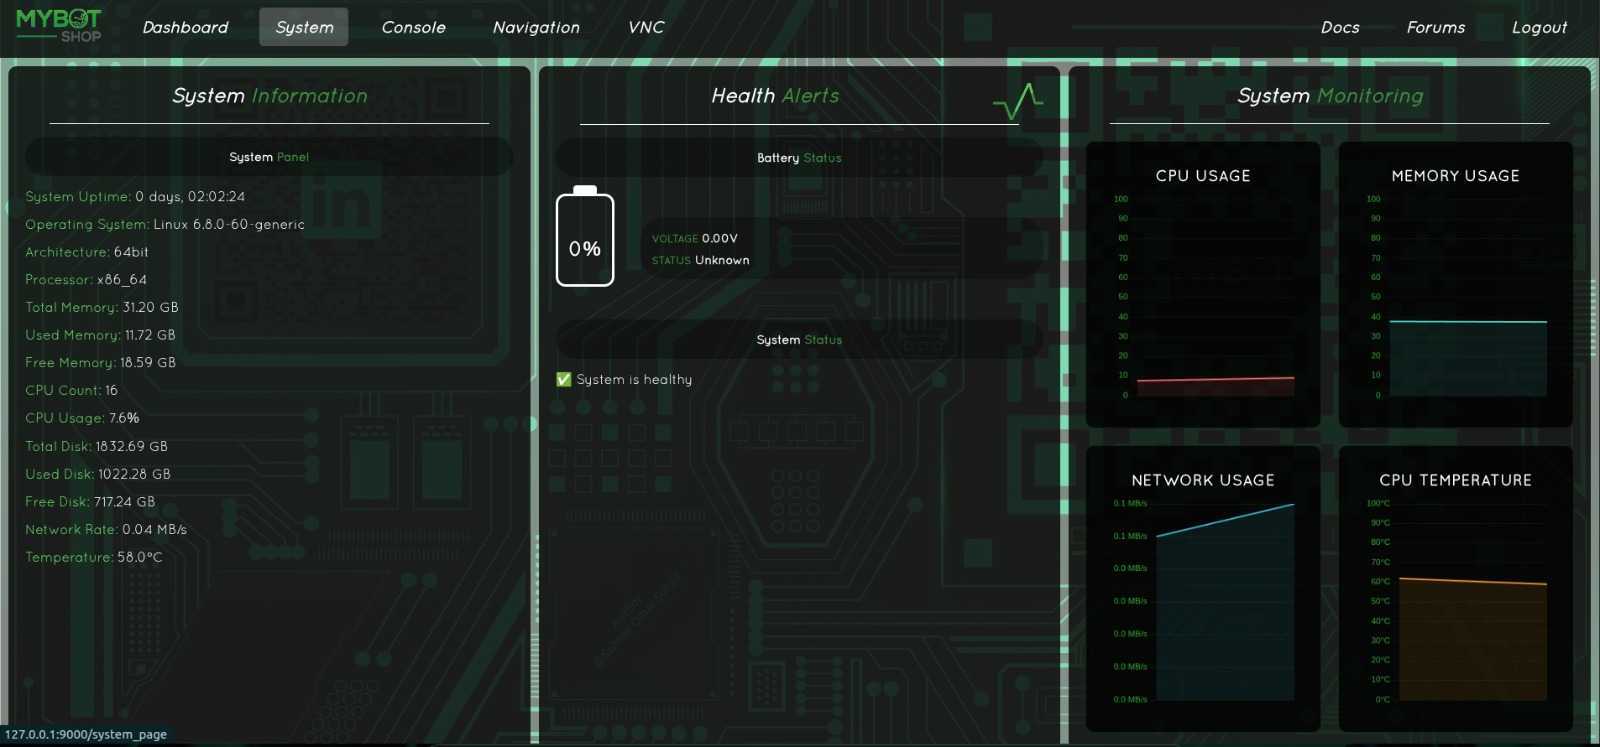
B2 Webserver
The B2 web server can be accessed by connecting to the B2’s Wi-Fi network and entering the following in your browser:
http://<robot_ip>:9000
Replace <robot_ip> with the actual IP address of the B2 (e.g., 192.168.123.164).
Note
The webserver provides useful control panels and monitoring features. Ensure your PC is connected directly to the B2 network.
Front Camera
TBA …
Rear Camera
TBA …
B2 Auto-Startup (Optional)
The B2 does not automatically start ROS jobs unless explicitly configured. By default, only the system.launch.py in b2_bringup is launched.
To check startup status:
sudo service b2-<service_name> status
Legend:
Red marker – Service failed
Green marker – Service running correctly
Grey marker – Service not started
To restart a failed or inactive service:
sudo service b2-<service_name> restart
To modify the upstart job or add new launch files, update:
b2_bringup/system.launch.py
Then install the new startup configuration:
ros2 run b2_bringup startup_installer.py
B2 Autonomous Vacuum Demo
Launch mission detection and movement:
ros2 launch b2_vision_action mission.launch.py
To save training images for RoboFlow dataset:
ros2 run b2_vision_action libimagecapture.py
Train the vision model:
python3 train.py
To update motion behavior, modify:
b2_vision_action/b2_vision_action/librosnode.py
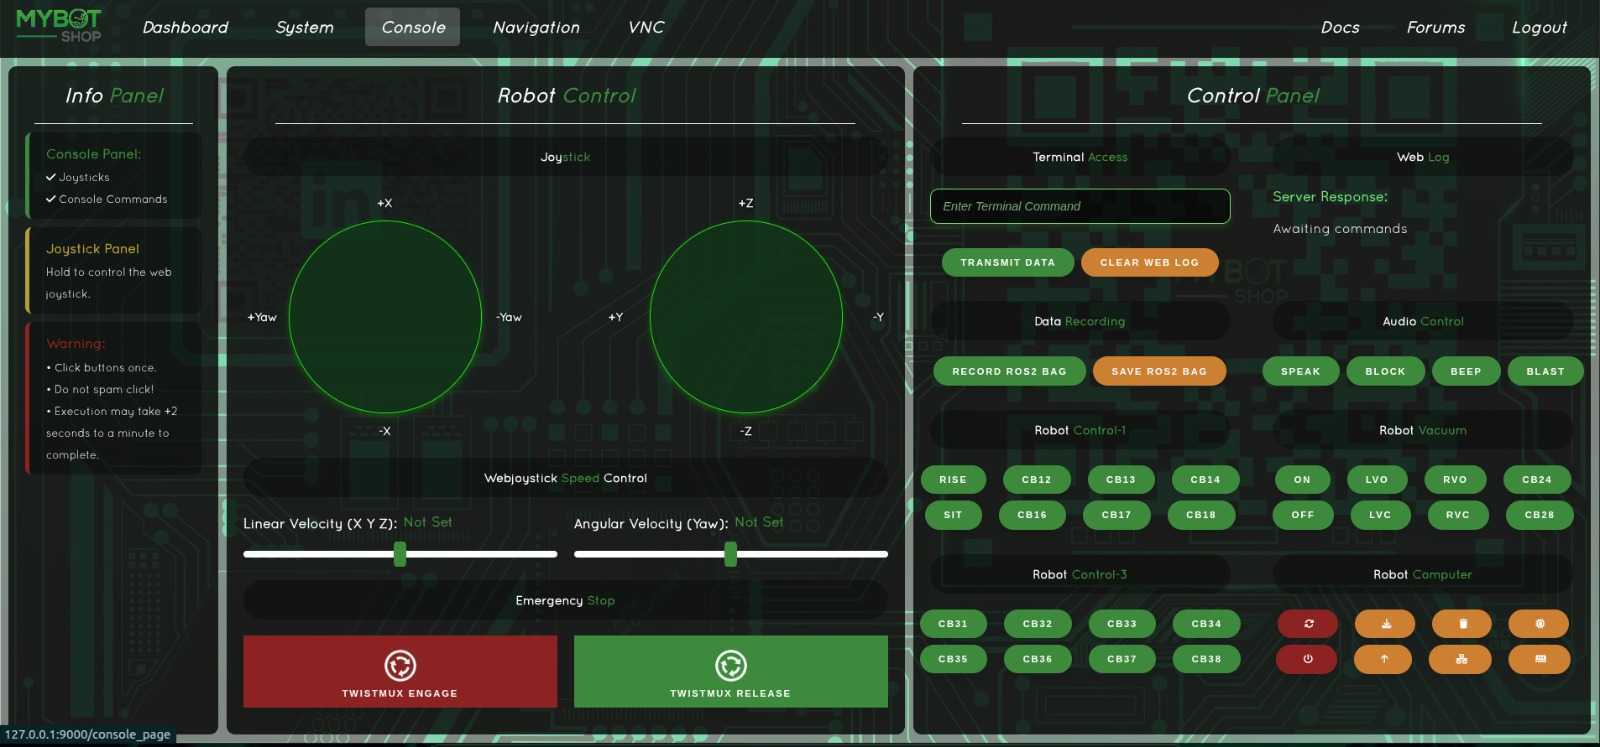
For additional control options, open the webserver (replace IP accordingly):
http://192.168.68.168:9000/console_page
B2 Gazebo Fortress Simulation
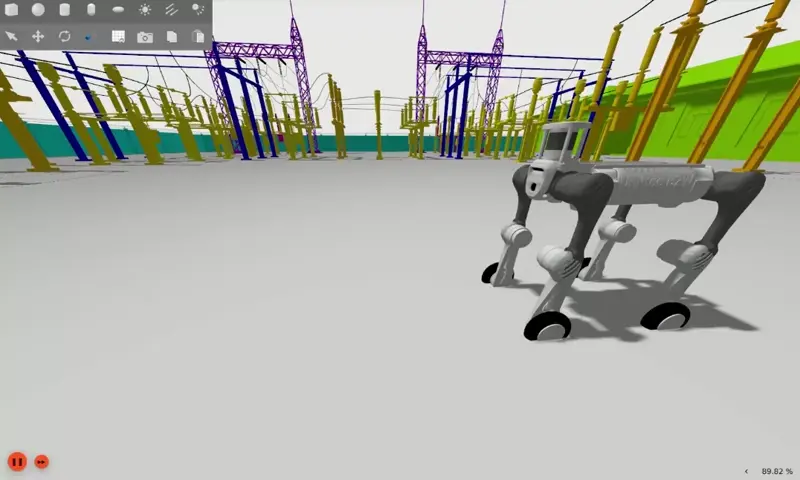
B2 Gazebo
Refer to GZ ROS2 Control documentation for advanced modifications.
B2 Simulation
Launch B2 Fortress simulation:
ros2 launch b2_gazebo b2_fortress_simulation.launch.py
B2W Simulation
Launch B2W Fortress simulation:
ros2 launch b2_gazebo b2w_fortress_simulation.launch.py
Cleanup After Simulation
To kill the Gazebo session:
ros2 run b2_gazebo kill_gz.sh
B2 Effort & Trajectory Control
Effort Trajectory Control Example
Send joint trajectory to the robot:
ros2 action send_goal /joint_effort_controller/follow_joint_trajectory control_msgs/action/FollowJointTrajectory -f "{
  trajectory: {
    joint_names: [
      'FL_hip_joint', 'FL_thigh_joint', 'FL_calf_joint',
      'FR_hip_joint', 'FR_thigh_joint', 'FR_calf_joint',
      'RL_hip_joint', 'RL_thigh_joint', 'RL_calf_joint',
      'RR_hip_joint', 'RR_thigh_joint', 'RR_calf_joint'
    ],
    points: [
      {
        positions: [0.0, 0.9, -1.5,
                    0.0, 0.9, -1.5,
                    0.0, 0.9, -1.5,
                    0.0, 0.9, -1.5],
        time_from_start: {sec: 2, nanosec: 0}
      }
    ]
  }
}"
B2W Wheeled Movement Example
Move Forward:
ros2 topic pub /velocity_controller/commands std_msgs/msg/Float64MultiArray "{
    data: [-1.0, -1.0, -1.0, -1.0]}"
Move Backward:
ros2 topic pub /velocity_controller/commands std_msgs/msg/Float64MultiArray "{
    data: [10.0, 10.0, 10.0, 10.0]}"
Stop Movement:
ros2 topic pub /velocity_controller/commands std_msgs/msg/Float64MultiArray "{
    data: [0.0, 0.0, 0.0, 0.0]}"
Effort Control Example (Disabled)
Affected Joints:
FL_hip_joint, FL_thigh_joint, FL_calf_joint,
FR_hip_joint, FR_thigh_joint, FR_calf_joint,
RL_hip_joint, RL_thigh_joint, RL_calf_joint,
RR_hip_joint, RR_thigh_joint, RR_calf_joint
Move Joints:
ros2 topic pub -1 /joint_effort_controller/commands std_msgs/msg/Float64MultiArray "{
    data: [
    -10.0, -30.0, 70.0,
     10.0, -30.0, 70.0,
    -10.0, -30.0, 70.0,
     10.0, -30.0, 70.0]
}"
Zero Effort to Joints:
ros2 topic pub -1 /joint_effort_controller/commands std_msgs/msg/Float64MultiArray "{
    data: [
    0.0, 0.0, 0.0,
    0.0, 0.0, 0.0,
    0.0, 0.0, 0.0,
    0.0, 0.0, 0.0]
}"
Position Control Example (Disabled)
Set Zero Position:
ros2 topic pub -1 /joint_position_controller/commands std_msgs/msg/Float64MultiArray "{
    data: [
    0.0, 0.0, 0.0,
    0.0, 0.0, 0.0,
    0.0, 0.0, 0.0,
    0.0, 0.0, 0.0]
}"
Position Trajectory Control (Disabled)
ros2 action send_goal /joint_trajectory_controller/follow_joint_trajectory control_msgs/action/FollowJointTrajectory -f "{
  trajectory: {
    joint_names: [
      'FL_hip_joint', 'FL_thigh_joint', 'FL_calf_joint',
      'FR_hip_joint', 'FR_thigh_joint', 'FR_calf_joint',
      'RL_hip_joint', 'RL_thigh_joint', 'RL_calf_joint',
      'RR_hip_joint', 'RR_thigh_joint', 'RR_calf_joint'
    ],
    points: [
      {
        positions: [1.57, 1.57, 1.57, 1.57, 1.57, 1.57, 1.57, 1.57, 1.57, 1.57, 1.57, 1.57],
        time_from_start: {sec: 1, nanosec: 0}
      }
    ]
  }
}"
B2 Xacro to URDF
Generate URDF from Xacro:
export B2_DESC=1

ros2 run xacro xacro /home/administrator/projects/quadrupeds/qre_b2/src/mybotshop/b2_description/xacro/robot.xacro > /home/administrator/projects/quadrupeds/qre_b2/src/mybotshop/b2_description/xacro/b2.urdf

ros2 run xacro xacro /opt/mybotshop/src/mybotshop/ascento_description/xacro/robot.xacro > /opt/mybotshop/src/mybotshop/ascento_description/xacro/ascento.urdf
B2 Installation
B2 Nvidia Board
Set hostname and directory:
sudo hostnamectl set-hostname B2-366
sudo mkdir /opt/mybotshop && sudo chown -R unitree:unitree /opt/mybotshop
Sync system time:
sudo timedatectl set-timezone Europe/Berlin
sudo date -s "$(wget --method=HEAD -qSO- --max-redirect=0 google.com 2>&1 | sed -n 's/^ *Date: *//p')"
Run installer:
cd /opt/mybotshop/src/mybotshop
./b2_install.bash
Build ROS2 workspace:
cd /opt/mybotshop
colcon build --symlink-install
source install/setup.bash
Update .bashrc:
# Mybotshop Additions
source /opt/ros/humble/setup.bash
source /opt/mybotshop/src/mybotshop/b2_bringup/config/setup.bash
Host PC (Ubuntu 20.04 with ROS2 Humble)
Ensure ROS2 Humble is installed but not sourced before first run.
Install dependencies:
./b2_install.bash
Create workspace and clone qre_b2:
Place in: /opt/mybotshop
Build Cyclone DDS:
colcon build --packages-select cyclonedds
Source workspace:
source install/setup.bash
source /opt/ros/humble/setup.bash
Build repository twice:
colcon build --symlink-install
Source the B2 bringup config:
source /opt/mybotshop/install/setup.bash
source /opt/mybotshop/src/mybotshop/b2_bringup/config/setup.bash
Configure static IP and network interface settings in setup.bash.
After Setup
To initialize environment after setup:
source /opt/mybotshop/src/mybotshop/b2_bringup/config/setup.bash
B2 Miscellaneous
Sync Host ↔ Unitree PC
rsync -avP -t --delete -e ssh src unitree@192.168.123.164://opt/mybotshop
SSH Key Setup
ssh-copy-id unitree@192.168.123.164
# Password: Unitree0408
B2 Camera Streaming
Front Camera:
gst-launch-1.0 udpsrc address=230.1.1.1 port=1720 multicast-iface=eth0 ! application/x-rtp, media=video, encoding-name=H264 ! rtph264depay ! h264parse ! avdec_h264 ! videoconvert ! autovideosink
Rear Camera:
gst-launch-1.0 udpsrc address=230.1.1.1 port=1721 multicast-iface=eth0 ! application/x-rtp, media=video, encoding-name=H264 ! rtph264depay ! h264parse ! avdec_h264 ! videoconvert ! autovideosink
B2 Software Updates
The latest software updates for QRE B2 can be pulled from the qre_b2 GitHub repository.
Note
If you do not have access to the repository, contact support@mybotshop.de with your GitHub Username and Purchase ID.