Robot Interface
Instructions for interfacing with the robot using Ubuntu 20.04 and ROS2 Foxy. This procedure should be followed after setting up and pairing with the GO2 Edu. Furthermore, all of the GO2’s functionality should be verified via the app.
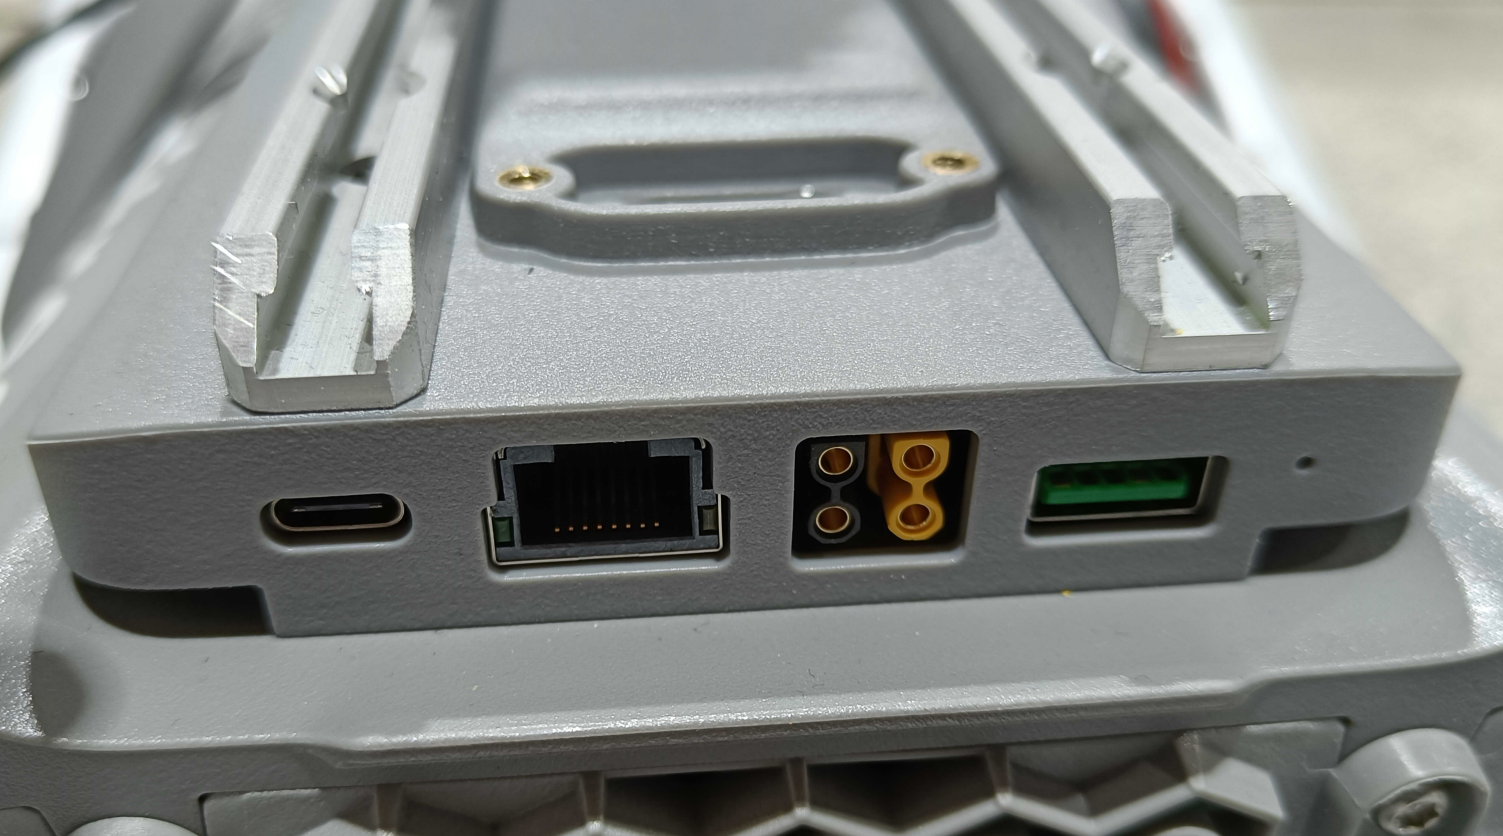
The Ethernet port at the back of the GO2 can be utilized for setting up communication via LAN.
Network Interface
For the first time, one needs to connect through a LAN cable to configure the robot’s network.
To create a static connection in your PC (not the robots), in Ubuntu go to Settings → Network then click on + and create a new connection.
Change the connection to Manual in the IPv4 settings.
Set the Address IP as 192.168.123.51 and the Netmask as 24.
Click save and restart your network.
After a successful connection, check the host’s local IP by typing in the Host PC’s terminal:
ifconfig
Next, ping the robot:
ping 192.168.123.18
Access the robot via SSH:
ssh -X unitree@192.168.123.18
The default password is:
123
IP Addresses
Robot |
IP Addresses |
Password |
|---|---|---|
GO2 MCU |
192.168.123.161 |
- |
GO2 External |
192.168.123.18 |
123 |
GO2 Router |
192.168.123.100 |
mybotshop |
GO2 Steamdeck |
192.168.123.150 |
mybotshop |
Warning
Sometimes other networks can cause disruptions when connecting to the GO2. It is best to have only your connection to the robot active and all others inactive.
Network Verification
Firstly, connect to the GO2 as described in the Network section Network Interface
Secondly, open several ssh sessions into the go2 via
ssh -X unitree@192 .168.123.18
Note
Verify that the robot is processing information by typing the command in an ssh session.
ros2 topic echo /sportmodestate
Note
If data is displayed then it means that the drivers are running.
Visualization
You can view the GO2’s current state by typing in one of the ssh sessions:
ros2 launch go2_viz view_robot.launch.py
Tele-operation
You can teleoperate the GO2 by running the following in one of the ssh sessions:
ros2 run teleop_twist_keyboard teleop_twist_keyboard
Mode Activation
Available GO2 Modes via ROS2 Services:
balance_stand
recovery_stand
stand_down
stand_up
stretch
damp
sit
rise_sit
front_jump
front_pounce
front_flip
stop_move
Available GO2 Functionalities via ROS2 Services:
Light level : 0-10
Volume level : 0-10
Note
Pressing the tab button on the keyboard will autocomplete the service request.
Example of activating mode
ros2 service call /go2/modes go2_srvs/srv/Go2Modes request_data:\ recovery_stand
Example of standing down
ros2 service call /go2/modes go2_srvs/srv/Go2Modes request_data:\ stand_down
Example of changing light level 0-10
ros2 service call /go2/light go2_srvs/srv/Go2Light light_level:\ 3
Example of activating mode
ros2 service call /go2/volume go2_srvs/srv/Go2Volume volume_level:\ 4
Note
At times the mode does not activate correctly such as stand, in those cases use the recovery stand.
Low-Level Control
The low-level control for GO2 can be directly used via Unitree’s provided example in their documentation. Running the provided qre-go2 driver with the low-level commands from Unitree examples should both work concurrently.
An example to test the low-level control is to suspend the go2.
Verify if the go2 bringup is running via:
sudo service ros2 status
Lie down the robot
ros2 service call /go2/modes go2_srvs/srv/Go2Modes request_data:\ stand_down
Put motors in damp state
ros2 service call /go2/modes go2_srvs/srv/Go2Modes request_data:\ damp
Run low-level example:
ros2 run go2_base go2_lowroscontrol
This will move the Rear Left leg of the GO2 with a force of 1N.m. An audible clicking sound can be heard if you try to move the GO2 left leg out of position.
Note
The GO2 low-level mode should only be used if you are familiar with low-level control, and gait planning and wish to create a new/custom controller for the GO2. The GO2 in low-level mode can easily be damaged if used incorrectly.
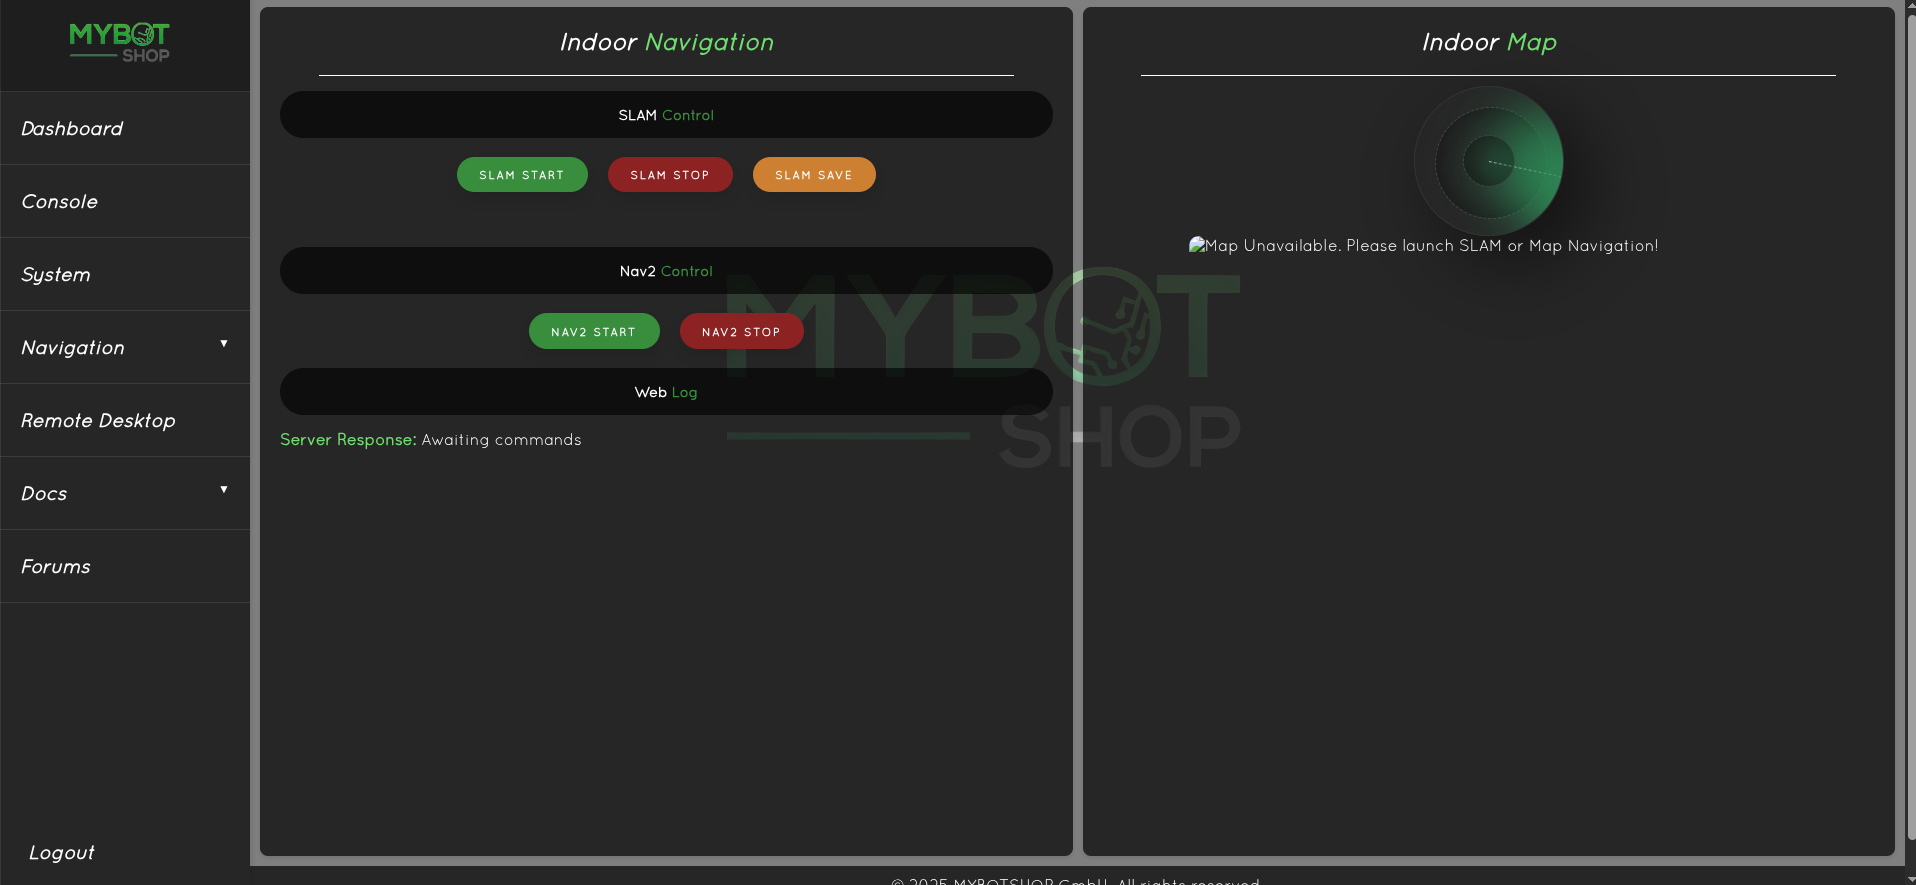
Navigation
Simultaneous Localization and Mapping (SLAM)
To create a map for map-based navigation, the first step is to create a map of the environment.
Move the robot slowly when building the map
Launch:
ros2 launch go2_navigation slam.launch.py
You can begin mapping using the teleop at 0.2m/s with the keyboard and/or the provided Logitech controller. Once you are satisfied with your map you can export it by running the following command:
cd/home/unitree/ros2_ws/src/go2_navigation/maps/
ros2 run nav2_map_server map_saver_cli -f map_
Rebuild so that the maps can be found (This is required if the map name is not map otherwise it will directly work):
colcon build --symlink-install
Then source the environment:
source /home/$USER/ros2_ws/install/setup.bash
Map Navigation
This will automatically take in the map created and save from the SLAM being map . If the map has been named something other, then in go2 navigation, the parameters have to be updated.

Select the 2D Pose Estimate and click and drag to where the robot corresponds in the map/

Once the robot is in the estimated location, it should self correct when the robot is moving as shown
Ensure the map is generated and available in the ros package (i.e. after the map is saved, you have placed and performed colcon build):
ros2 launch go2_navigation map_navi.launch.py
Drivers AutoStartup
Important
The go2 bringup system launch is not required if the go2 startup has been installed. This can be verified by typing in the terminal
sudo service ros2 status
If it is available and green, then do not launch the go2_bringup as it is running in the background.
Launch the go2 ros driver the communicates and publishes the state of the robot joints.
ros2 launch go2_bringup system.launch.py
Startup (Optional)
The GO2 ordinarily does not have a startup job unless otherwise specified (In this case the GO2 has a startup job). The GO2 launches the go2_bringup system.launch.py. To verify if the startup job is available in GO2. Run the command:
sudo service ros2 status
Warning
If an error such as Unit ros2.service could not be found., then it means that there is no startup installed.
The red marker in the service indicates that the startup job has failed.
Green marker indicates everything is working correctly.
Grey marker indicates that the service has not started yet.
In case of red or grey marker, you may restart the service via:
sudo service ros2 restart
If you want to modify the upstart job or add other ROS launch files to it then it is recommended to add your changes to the main upstart file i.e. system.launch.py located in the go2_bringup package. Once done, save the file and run the following command to update startup job.
ros2 run go2_bringup startup_installer.py
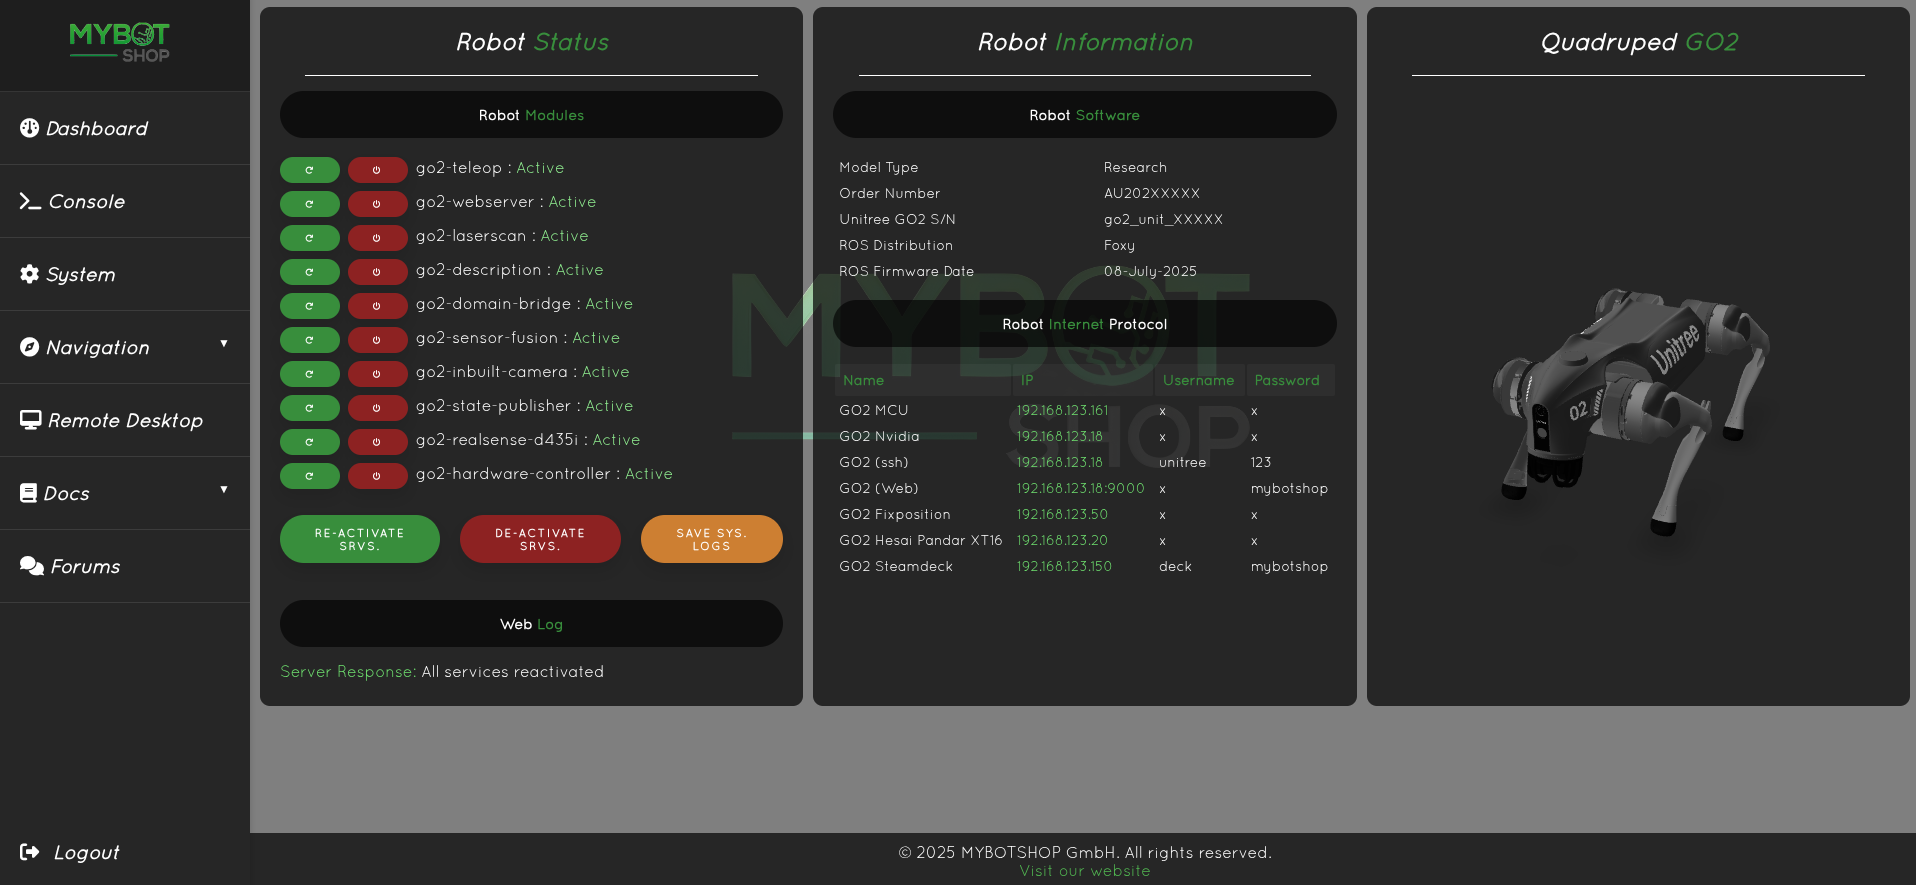
Webserver
This module should come pre-installed for heavy integration projects. It should be accessible directly at http://192.168.123.18:9000/ or the WiFi ip to which the robot is connected. The GO2 webserver can be configured via the config file in go2_webserver ros2 package located in /opt/mybotshop/src/mybotshop/go2_webserver/config/robot_webserver.yaml
Login

Dashboard
Enable the GO2 ROS2 Services
Disable the GO2 ROS2 Services
Record System GO2 logs
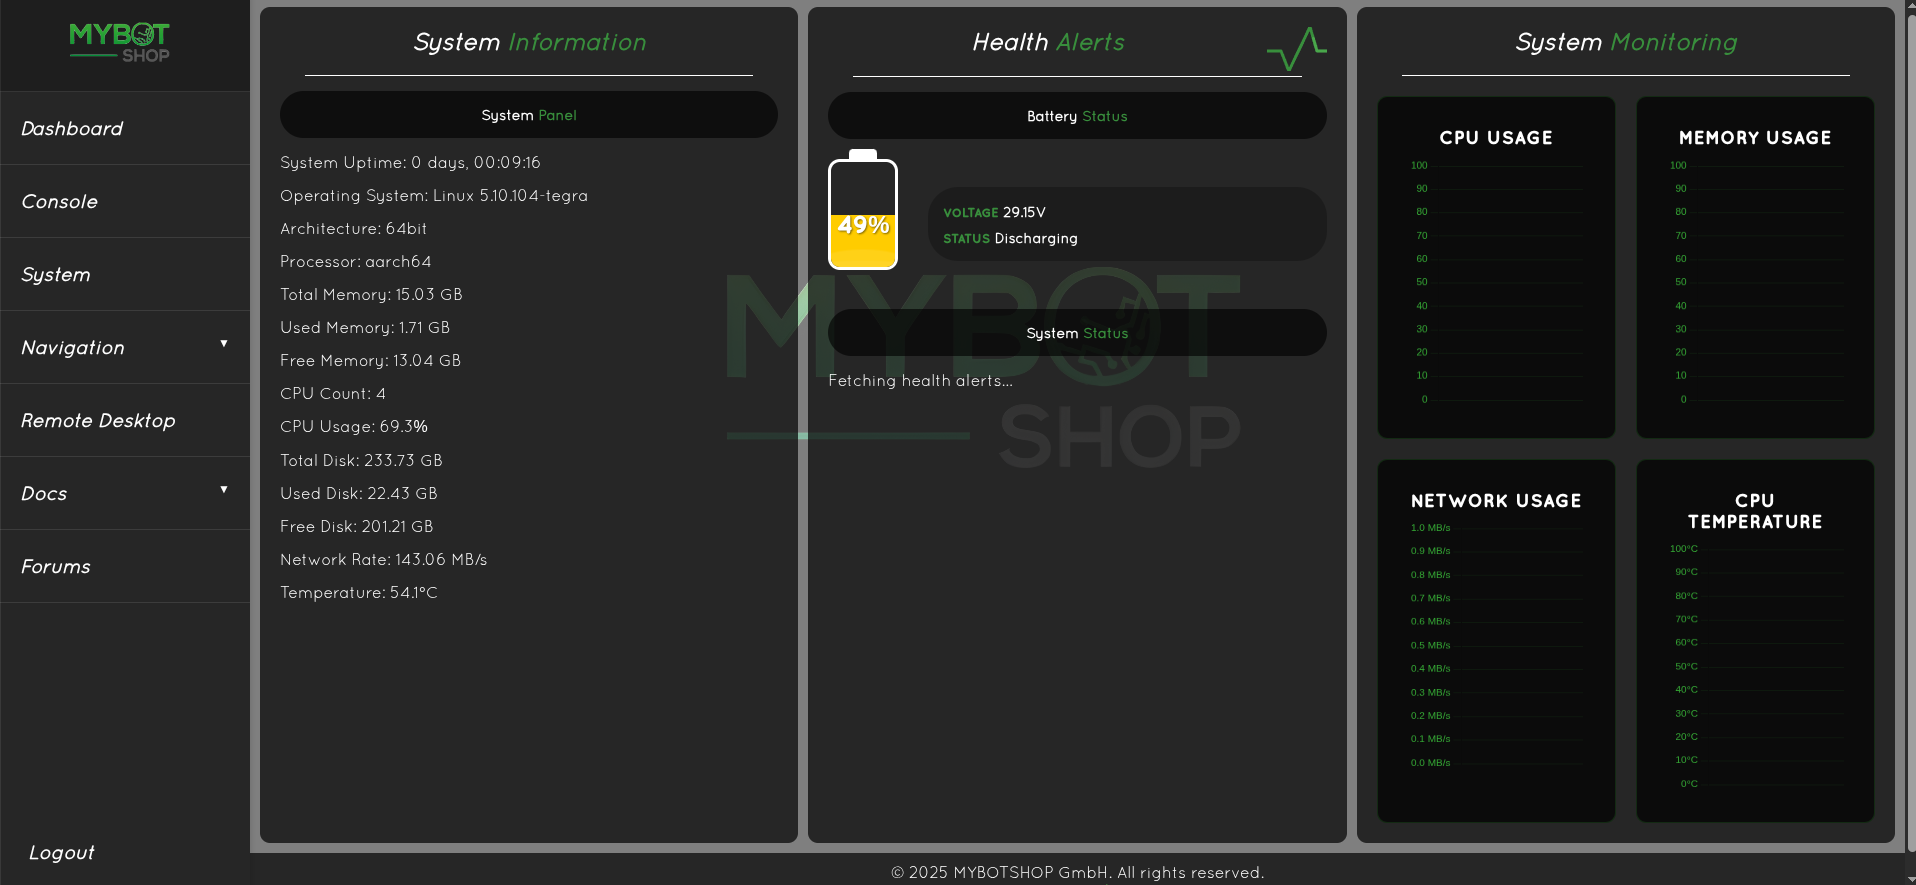
System
View GO2 external PC system status.
The battery only runs if the ROS2 drivers are enabled from the dashboard
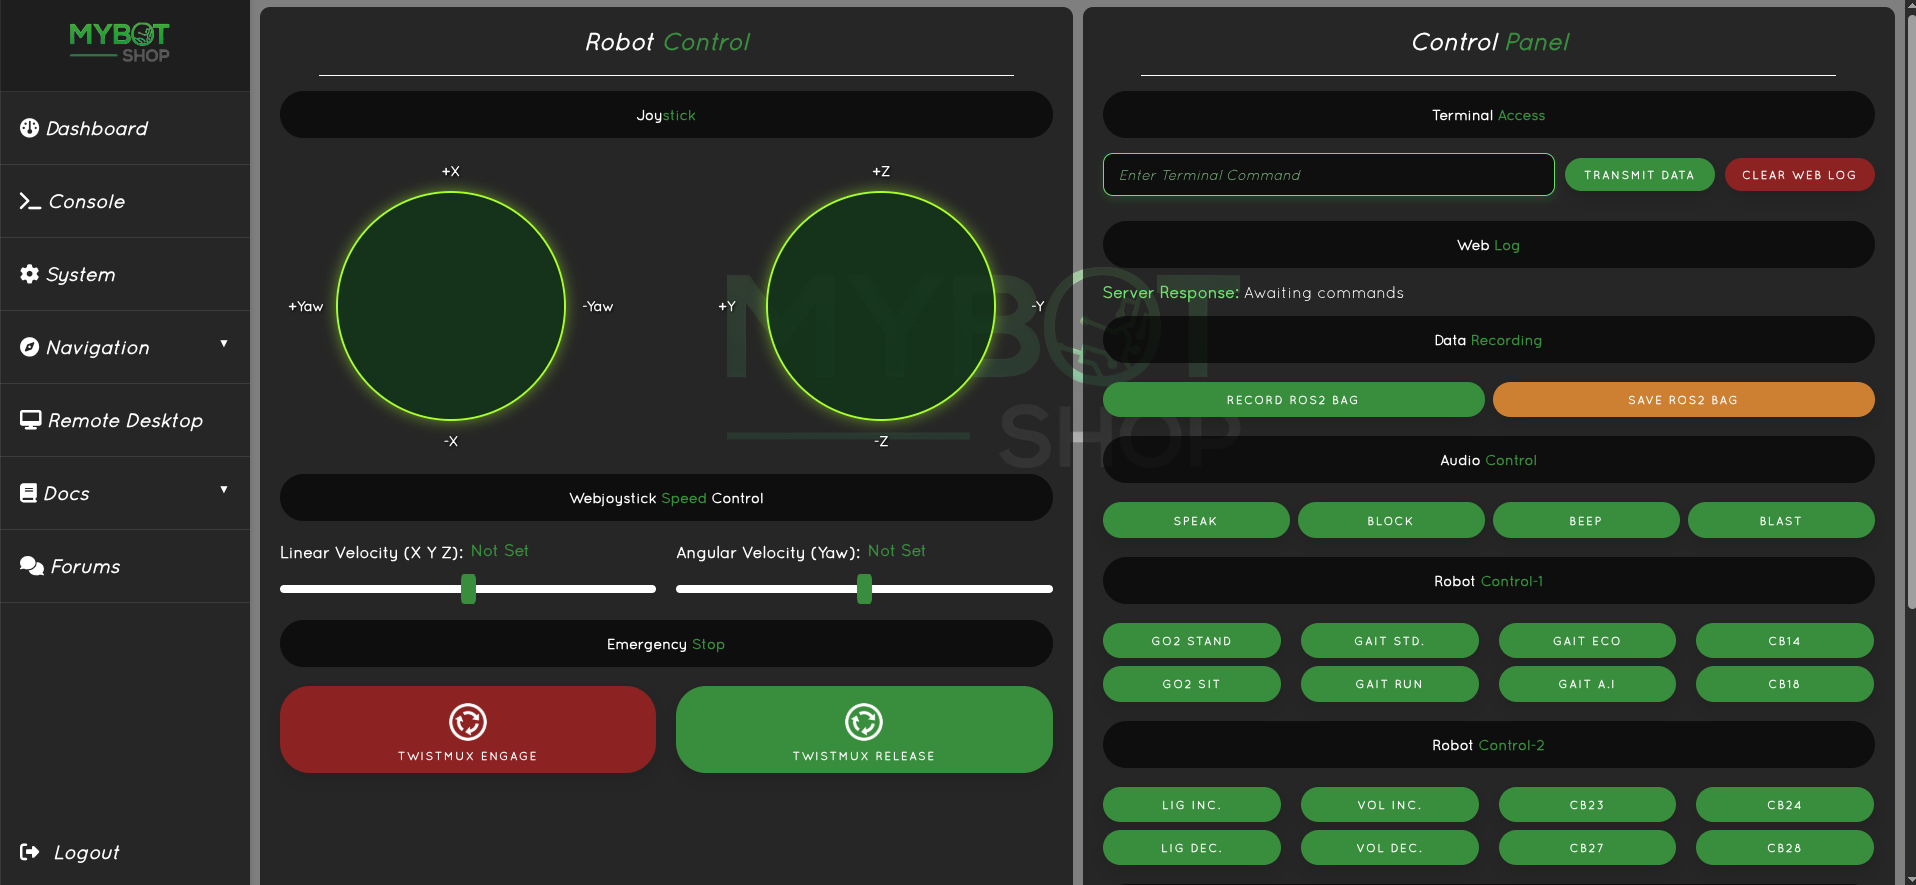
Console
Movement of the Unitree GO2
Switch between Gaits
Adapatable to new ros2 services
Record ROS2 bags
Access GO2 external speaker if available
The console only works if the ROS2 drivers are enabled from the dashboard
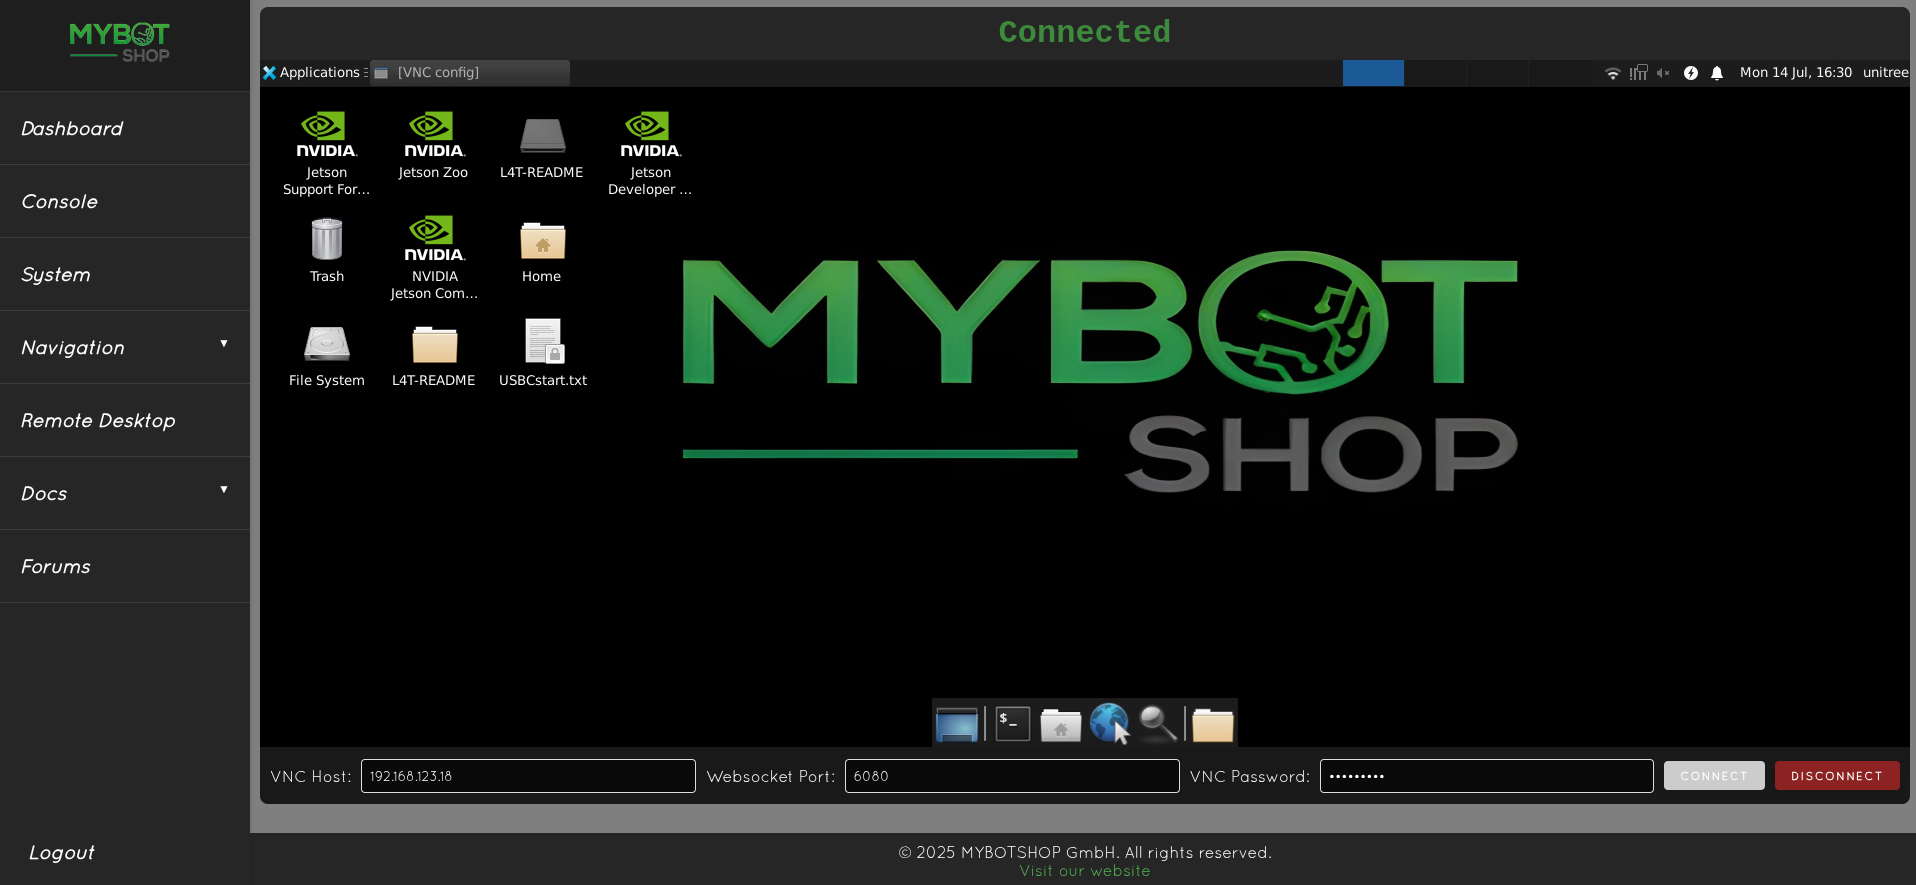
Remote Desktop
On-board screen of the Unitree GO2’s computer
Navi Indoor
Disabled
Steamdeck
Please follow the instructions carefully in here to start the GO2 Steamdeck.
Connect to the custom router of the Go2, it may take a few minutes on startup of the robot.
The IP of the steamdeck is 192.168.123.150
The IP of the router is 192.168.123.100
The IP of the Unitree Go2 is 192.168.123.18
Once the joystick is opened hold L1 and use the left and right joystick to move the robot.
You can change to different movement styles (gaits) for the go2 via the web browser as mentioned below in the console tab.
The web browser will automatically open and take you to https://192.168.123.18:9000.
The drivers on GO2 are off by default. You can click on restart all to start all ROS2 services enabling control via the steamdeck+ros2.
The console menu can be used to change between the different gaits. Additionally, more services can be added in /opt/mybotshop/src/mybotshop/go2_webserver/go2_webserver/libroscustom.py
Sensors
Intel Realsense D435i
To launch the Realsense d435i, launch:
ros2 launch go2_depth_camera realsense_d435i.launch.py
By default the Realsense D435i is off.
The launch file is configured to enable continuous depth stream information from the Realsense d435i without lag. To further change parameters, simply change the configuration in the:
go2_depth_camera/launch/realsense_d435i.launch.py
Intel Realsense D405
Note
If launching both realsense cameras. Launch them in separate terminals with 10-second delay. Ensure that in their launch files, their serial numbers are assigned.
To launch the Realsense D405, launch:
ros2 launch go2_depth_camera realsense_d405.launch.py
By default the Realsense D405 is off.
The launch file is configured to enable continuous depth stream information from the Realsense D405 without lag. To further change parameters, simply change the configuration in the
go2_depth_camera/launch/realsense_d405.launch.py
Mid360 Lidar
To activate the Livox Mid360 Lidar, launch:
ros2 launch go2_livox system.launch.py
By default the Livox Mid360 is off.
SIYI ZT30
Gimbal velocity control
ros2 topic pub /$GO2_NS/zt30/gimbal/control/cmd go2_interface/msg/CameraGimbalCmd '{yaw: 10, pitch: 0}'
Select Camera Mode
Main: Wide, Sub: Zoom (Default)
HD Wide | Thermal Zoom
HD Zoom | HD Wide
HD Wide
HD Wide | PIP (Wide Main, Zoom Sub)
HD Wide | PIP (Zoom Main, Wide Sub)
HD Wide | Dual-split (Wide & Zoom)
Thermal Zoom | Thermal, Sub: Zoom
Main: Thermal, Sub: Wide
Thermal only
Dual-split (Thermal + Visible)
PIP (Thermal Main, Zoom Sub)
Normal Camera
ros2 service call /$GO2_NS/zt30/camera_mode go2_interface/srv/CameraMode '{camera_mode: 0}'
Thermal
ros2 service call /$GO2_NS/zt30/camera_mode go2_interface/srv/CameraMode '{camera_mode: 8}'
Take photo
ros2 service call /$GO2_NS/zt30/trigger_photo std_srvs/srv/Trigger {}
Start Recording
ros2 service call /$GO2_NS/zt30/trigger_video std_srvs/srv/Trigger {}
Zoom in
ros2 service call /$GO2_NS/zt30/zoomin_control std_srvs/srv/Trigger {}
Zoom Out
ros2 service call /$GO2_NS/zt30/zoomout_control std_srvs/srv/Trigger {}
Manipulation
D1
D1 Driver
ROS_DOMAIN_ID=10 ros2 launch d1_controller controller.launch.py
D1 Enable Motors
ROS_DOMAIN_ID=10 ros2 service call /$GO2_NS/d1/enable_load std_srvs/srv/SetBool "{data: true}"
D1 Disable Motors
ROS_DOMAIN_ID=10 ros2 service call /$GO2_NS/d1/enable_load std_srvs/srv/SetBool "{data: false}"
D1 Trajectory Control
Note
All angles are in radian except for gripper
Joint poses intuitively
d1_link1_joint  : base rotation
d1_link5_joint  : gripper pitch
d1_link6_joint  : gripper roll
d1_link_l_joint : gripper grasp (Max:1.0, Min:-1.0)
Home position
ROS_DOMAIN_ID=10 ros2 action send_goal /$GO2_NS/d1/follow_joint_trajectory control_msgs/action/FollowJointTrajectory "
trajectory:
joint_names: ['d1_link1_joint', 'd1_link2_joint', 'd1_link3_joint', 'd1_link4_joint', 'd1_link5_joint', 'd1_link6_joint', 'd1_link_l_joint']
points:
- positions: [0.0, -1.0, 1.047, 0.0, 0.0, 0.0, 1.0]
   time_from_start: {sec: 1, nanosec: 0}
"
Stand position
ROS_DOMAIN_ID=10 ros2 action send_goal /$GO2_NS/d1/follow_joint_trajectory control_msgs/action/FollowJointTrajectory "
trajectory:
joint_names: ['d1_link1_joint', 'd1_link2_joint', 'd1_link3_joint', 'd1_link4_joint', 'd1_link5_joint', 'd1_link6_joint', 'd1_link_l_joint']
points:
- positions: [0.0, 0.0, 0.0, 0.0, 0.0, 0.0, 1.0]
   time_from_start: {sec: 1, nanosec: 0}
"
Custom position
ROS_DOMAIN_ID=10 ros2 action send_goal /$GO2_NS/d1/follow_joint_trajectory control_msgs/action/FollowJointTrajectory "
trajectory:
joint_names: ['d1_link1_joint', 'd1_link2_joint', 'd1_link3_joint', 'd1_link4_joint', 'd1_link5_joint', 'd1_link6_joint', 'd1_link_l_joint']
points:
- positions: [0.0, -0.4, 1.4, 0.0, 0.0, 0.0, 1.0]
   time_from_start: {sec: 1, nanosec: 0}
"
Open Manipulator (OM)
OM Driver
Start Open-manipulator custom ROS driver
ros2 launch go2_manipulation openmanipulator.launch.py
This should always be running when using the provided moveit and/or joint trajectories
Launch moveit and state publisher
ros2 launch go2_manipulation moveit2.launch.py
OM Commands
Note
Be sure to update the namespace accordingly if applicable!
Test the driver
ROS_DOMAIN_ID=10 ros2 action send_goal /$GO2_NS/open_manipulator/joint_trajectory_controller/follow_joint_trajectory control_msgs/action/FollowJointTrajectory -f "{
trajectory: {
   joint_names: [joint1, joint2, joint3, joint4],
   points: [
      { positions: [0.1, 0.1, 0.1, 0.1], time_from_start: { sec: 2 } },
      { positions: [-0.1, -0.1, -0.1, -0.1], time_from_start: { sec: 4 } },
      { positions: [0, 0, 0, 0], time_from_start: { sec: 6 } }
   ]
}
}"
Home position (Must be done when turning off) (GO2 Prior to 06 March 2025)
ROS_DOMAIN_ID=10 ros2 action send_goal /go2_unit_001/open_manipulator/joint_trajectory_controller/follow_joint_trajectory control_msgs/action/FollowJointTrajectory -f "{
trajectory: {
   joint_names: [joint1, joint2, joint3, joint4],
   points: [
      { positions: [0.0, -1.4, 1.2, 1.2], time_from_start: { sec: 2 } },
   ]
}
}"
Stand position
ROS_DOMAIN_ID=10 ros2 action send_goal /$GO2_NS/open_manipulator/joint_trajectory_controller/follow_joint_trajectory control_msgs/action/FollowJointTrajectory -f "{
trajectory: {
   joint_names: [joint1, joint2, joint3, joint4],
   points: [
      { positions: [0.0, -0.2, -0.1, -0.24], time_from_start: { sec: 1 } },
   ]
}
}"
Home position (Must be done when turning off) (GO2 After 06 March 2025 - Stl will be added in Go2 Description soon!)
ROS_DOMAIN_ID=10 ros2 action send_goal /$GO2_NS/open_manipulator/joint_trajectory_controller/follow_joint_trajectory control_msgs/action/FollowJointTrajectory -f "{
trajectory: {
   joint_names: [joint1, joint2, joint3, joint4],
   points: [
      { positions: [0.0, -1.7, 1.4, 1.2], time_from_start: { sec: 2 } },
   ]
}
}"
Close gripper (Must be done when turning off)
ROS_DOMAIN_ID=10 ros2 action send_goal /$GO2_NS/open_manipulator/gripper_controller/follow_joint_trajectory control_msgs/action/FollowJointTrajectory -f "{
trajectory: {
   joint_names: [gripper],
   points: [
      { positions: [1.0], time_from_start: { sec: 2 } },
   ]
}
}"
Open gripper
ROS_DOMAIN_ID=10 ros2 action send_goal /$GO2_NS/open_manipulator/gripper_controller/follow_joint_trajectory control_msgs/action/FollowJointTrajectory -f "{
trajectory: {
   joint_names: [gripper],
   points: [
      { positions: [-1.0], time_from_start: { sec: 2 } },
   ]
}
}"
Open Manipulator X (MYBOTSHOP Independent)
Independent launch of open manipulator x
ros2 launch open_manipulator_x_controller open_manipulator_x_controller.launch.py
Teleop open manipulator x
ros2 run open_manipulator_x_teleop teleop_keyboard
Lidar - Obstacle Avoidance
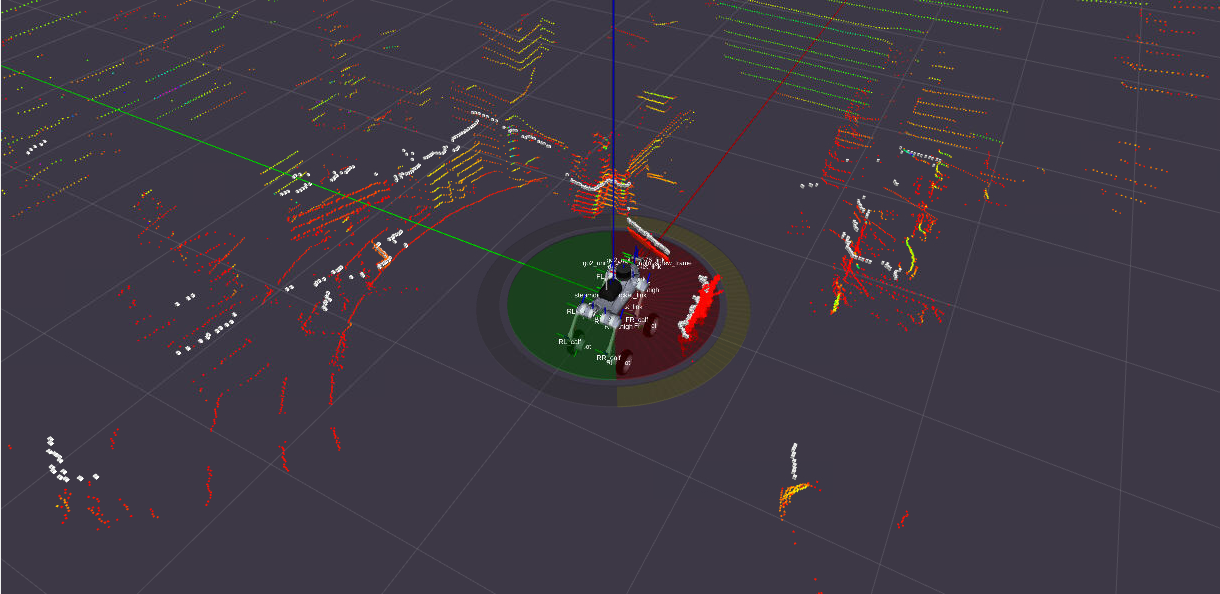
Lidar Based Obstacle Avoidance
A ros2 package that enables obstacle avoidance using the Mid360 Lidar. The obstacle avoidance can be enabled/disabled via a ros2 service.
The inner zone will stop the robot if an obstacle is detected, while the outer zone will slow down the robot.
ROS_DOMAIN_ID=10 ros2 service call /$GO2_NS/obstacle_avoidance_mode go2_interface/srv/Go2Modes '{request_data: enable}'
ROS_DOMAIN_ID=10 ros2 service call /$GO2_NS/obstacle_avoidance_mode go2_interface/srv/Go2Modes '{request_data: disable}'
Simulation
Issac Sim
Note
Instructions for usage are in the humble branch qre-go2-humble
Gazebo (ROS2 Humble)
Update the robot.xacro with the gazebo extension controllers
GO2 Gazebo
ros2 launch go2_gazebo go2_fortress_simulation.launch.py
GO2W Gazebo
Update the accessories.xacro with the wheels
ros2 launch go2_gazebo go2_fortress_simulation.launch.py
GO2/GO2-W Effort Trajectory Control Example
Robot Movement Example
ros2 action send_goal /joint_effort_controller/follow_joint_trajectory control_msgs/action/FollowJointTrajectory -f "{
trajectory: {
   joint_names: [
      'FL_hip_joint', 'FL_thigh_joint', 'FL_calf_joint',
      'FR_hip_joint', 'FR_thigh_joint', 'FR_calf_joint',
      'RL_hip_joint', 'RL_thigh_joint', 'RL_calf_joint',
      'RR_hip_joint', 'RR_thigh_joint', 'RR_calf_joint'
   ],
   points: [
      {
      positions: [0.0, 0.9, -1.5,
                  0.0, 0.9, -1.5,
                  0.0, 0.9, -1.5,
                  0.0, 0.9, -1.5],
      time_from_start: {sec: 2, nanosec: 0}
      }
   ]
}
}"
GO2W Wheeled Example
Move forward
ros2 topic pub /velocity_controller/commands std_msgs/msg/Float64MultiArray "{
   data: [-1.0, -1.0, -1.0, -1.0]}"
Move backward
ros2 topic pub /velocity_controller/commands std_msgs/msg/Float64MultiArray "{
   data: [10.0, 10.0, 10.0, 10.0]}"
Stop Moving
ros2 topic pub /velocity_controller/commands std_msgs/msg/Float64MultiArray "{
   data: [0.0, 0.0, 0.0, 0.0]}"
Effort Control Example (Disabled)
Corresponding Joints
'FL_hip_joint', 'FL_thigh_joint', 'FL_calf_joint',
'FR_hip_joint', 'FR_thigh_joint', 'FR_calf_joint',
'RL_hip_joint', 'RL_thigh_joint', 'RL_calf_joint',
'RR_hip_joint', 'RR_thigh_joint', 'RR_calf_joint'
Move joints
ros2 topic pub -1 /joint_effort_controller/commands std_msgs/msg/Float64MultiArray "{
   data: [
   -10.0, -30.0, 70.0,
   10.0, -30.0, 70.0,
   -10.0, -30.0, 70.0,
   10.0, -30.0, 70.0]
}"
0 effort Joints
ros2 topic pub -1 /joint_effort_controller/commands std_msgs/msg/Float64MultiArray "{
   data: [
   0.0, 0.0, 0.0,
   0.0, 0.0, 0.0,
   0.0, 0.0, 0.0,
   0.0, 0.0, 0.0]
}"
Position Control Open Manipulator X
ros2 action send_goal /joint_position_controller/follow_joint_trajectory control_msgs/action/FollowJointTrajectory -f "{
trajectory: {
   joint_names: [joint1, joint2, joint3, joint4, gripper],
   points: [
      { positions: [0.0, -1.57, 1.57, 0.5, 0.0], time_from_start: { sec: 1 } },
   ]
}
}"
Cleanup Gazebo
ros2 run go2_gazebo kill_gz.sh