GO1 Manuals
Important
The following text are hyperlinks to demonstratory videos. Click on them to get redirected to the websites.
Attention
It is highly recommended to view the quick start manual and user manual before using the robot to ensure safe and correct operation.
Note
Currently, we do not have the ultrasound SDK’s but will be provided as soon as available.
GO1 Apps
GO1 Network
Once the apps are installed users can connect to the native hot-spot of GO1 or through the Ethernet port to access its on-board computers.
GO1 has the network address range of 192.168.123.*. The SSID of the Wifi network of GO1’s hot-spot begins
with UnitreeRoboticsGO1-###, where the hash tags represent the GO1’s model number and the default password is
00000000 or 8 zeros.
Once connected to the WiFi network, one can access GO1’s app, web-control, and PCs.
Important
It is recommended to connect to the GO1’s LAN when developing and testing for better connectivity.
GO1 Basic Operations
A video demonstration on starting-up the robot and performing various actions is given below. It also includes instructions on the activation of companion mode.
Good to know commands:
Walking: START (Press double times)
Running: L2+START
Standing: START
Jump in direction: R2+(direction key)
Undamped state: L2+B
Prone position: L2+A (Press double times to go onto standing position)
In standing position:
Rollover: L2+Y
Bow with Hands: L1+A (Press START to cancel)
Dance type 1: L1+X (Press START to cancel)
Dance type 2: R1+X (Press START to cancel)
In advanced mode (Triggered by pressing START two times rapidly):
Obstacle avoidance: Y (On)
Obstacle avoidance: X (Off)
Stair climbing: A (On)
Stair climbing: B (Off)
Note
Some features are bound to the version of the GO1.
Once connected to the WiFi of the GO1. You can access the GO1 website by entering the following in the web addess bar 192.168.12.1.
The GO1’s Firmware version, motor temperature, vision, and control can all be accessed in here.
GO1 Calibration
Robot Drift
Turn on the robot and the remote.Once the robot is fully booted and stands up, press start
While the robot is trotting press the left or right arrow keys opposite of the Go1 drift on the controller keypad
Continue pressing the keys until drift stops and press b to save (this has to be done before the robot trotting stops)
IMU Calibration
If the robot is standing, press
L2 + Atwice to make the robot lie down.Press
L1 + L2 + Startmultiple times until the robot enters non-damping mode (you should be able to move the leg joints freely without resistance).Press
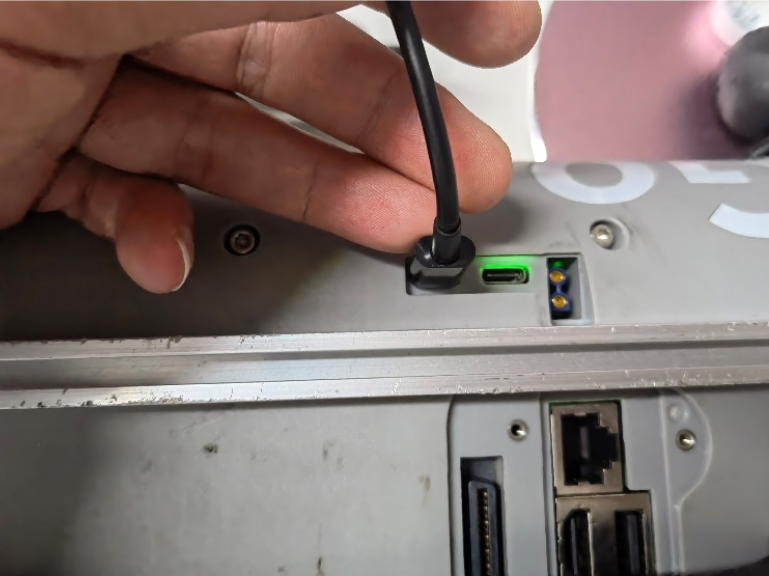
L1 + Band position the legs so they are close to the ground (as shown in the image below).
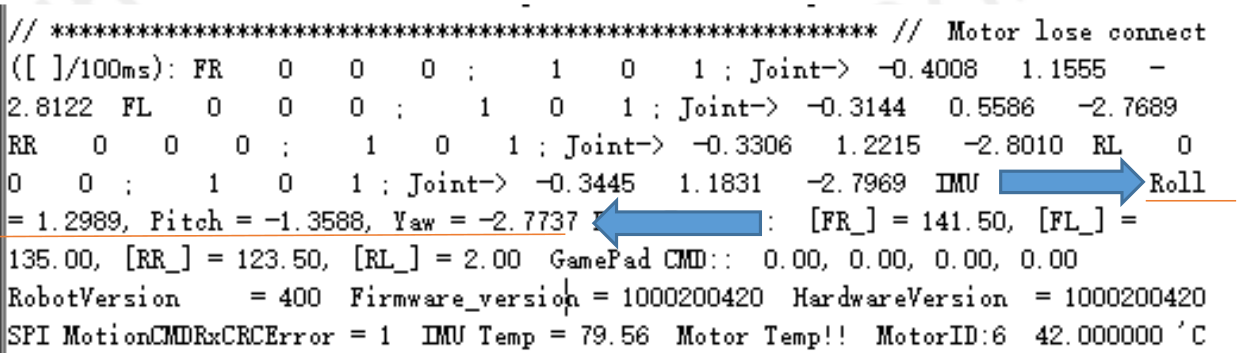
Connect the robot via the Type-C port and use the XCOM software to read the data via the serial port.
Focus on the Roll and Pitch values in the software.
Slowly move the body until the values approach 0, or use a flat surface for this step.
|
|
Press
L2 + Band let the robot maintain this position for 3 minutes.Restart the robot.
This process helps correct fuselage skew issues, ensuring the robot’s body and ground remain parallel.
Leg Calibration
Some Go1 have different firmware. For most of the Go1’s follow until step 2, and then continue from the calibration video.
Turn on the robot dog, L2+B makes the robot dog lie down.
Press L2+B twice to make the robot dog enter the undamped mode
Important
Twisting the leg joints of the robot dog will not feel damping at this time.
Follow the video guide for the rest of the video guide, as the procedure is the same.
Remote Calibration
Hold the remote control but do not touch the joystick.
Press the remote control buttons F1 and F3 and release them at the same time.
At this time, the remote control will emit a continuous drip ~ drip ~ sound (1 time / second) to
indicate that it has entered the calibration mode.
After entering the calibration mode, move the left and right joysticks to full rudder and rotate it several times until the
drip ~ drip ~sound stops, and the calibration is ready.Press F3 once to make the calibration take effect and complete the calibration.
Note
Please do not touch the joystick before calibrating, only enter the calibration mode to move the joystick. After calibration, you can view the status of the joystick after calibration through APP. (reference Page: 33 of the user manual)
Robot Falling Over
Replace the robots foot paws. (In the video tutorials)
GO1 (EDU) Hotspot Password
The default GO1 Hotspot password is 00000000.
To change the GO1 password connect to the GO1 via Ethernet.
SSH into the pi as described in Network-Setup.

Edit the hotspot connection via the nano command.
sudo nano /etc/hostapd/hostapd.conf
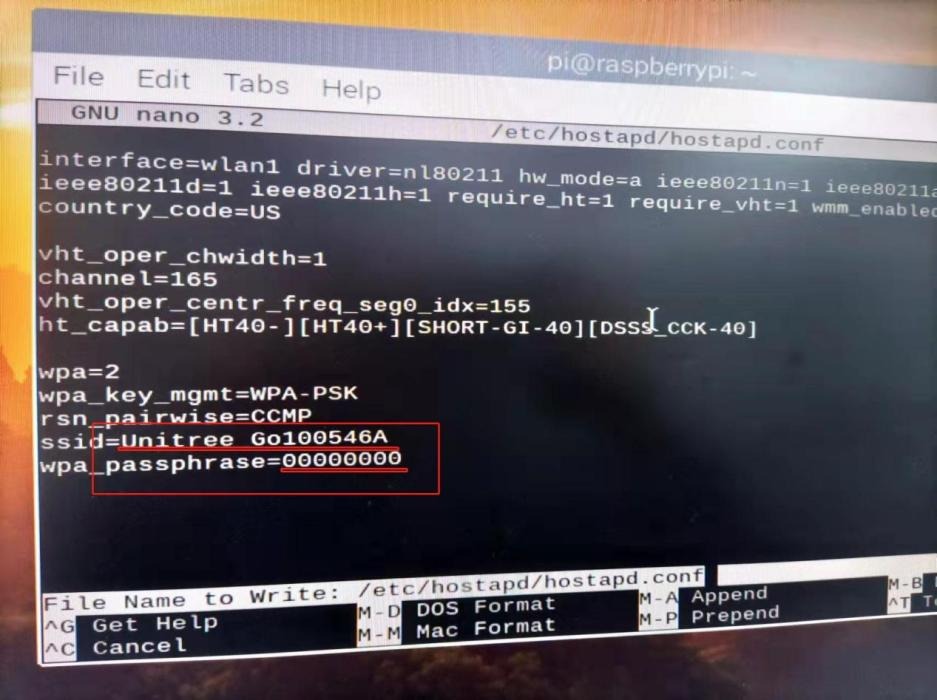
Reboot the PC
sudo reboot
GO1 External Power-Supply
Important
The procedure described below is only for development purposes. It turns on the robot without a battery inside from the external power supply. The power supply should atleast be able to provide 24V/20A.
Remove the battery from the GO1.
Ensure the GO1 is placed on the ground with all four paws as well as knee joints touching the ground.
It is advised to place robot on some carpet or similar compressible surface to prevent damage to the joints.
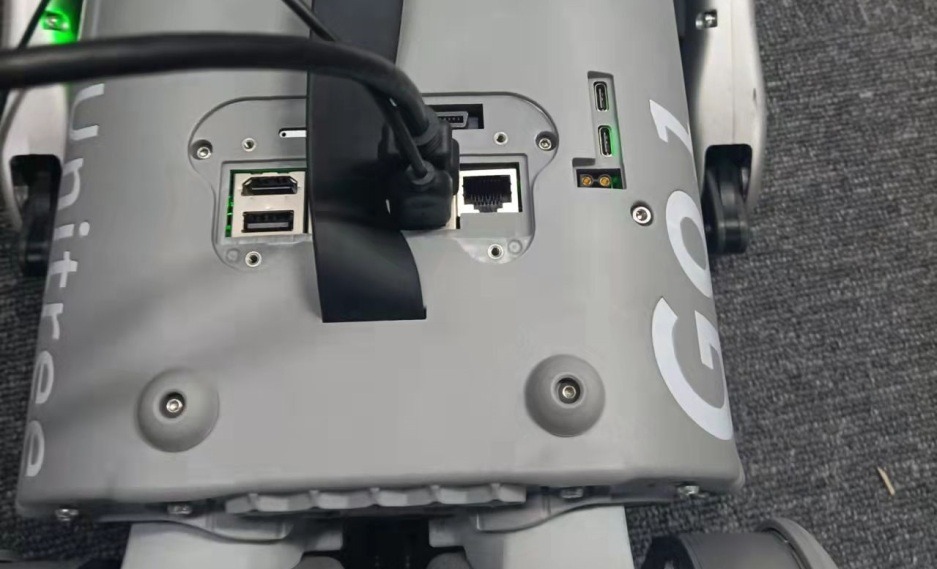
Connect the cable to the connection ports on the GO1’s back.
The GO1 requires 24V with around 20A of current. At startup it may take up to 20A of current.
Be vigiliant and make sure the XT30 male pins are in the correct orientation when plugging in.
GO1 Serial Port Check
Follow the instructions from this manual using this executable.
GO1 Firmware Update
Warning
This procedure may disrupt and potentially render the GO1 unusable. It is recommended to not upgrade if all functionalities are working correctly, GO1 Firmware Update